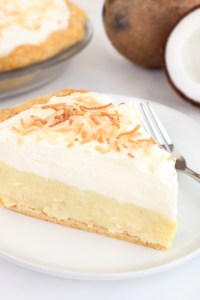
This classic coconut cream pie recipe comes together in three simple steps: fully blind baking a flaky pie crust, making a rich coconut custard filling, and topping it all with whipped cream. The only place I stray slightly from tradition is by using cream cheese-stabilized whipped cream, which adds structure and helps prevent the topping from becoming runny when the pie is made ahead. You can skip the cream cheese, but I would recommend adding the whipped cream just before serving to prevent it from getting runny.
I developed this recipe to walk you through each step with confidence, and have included plenty of tips and techniques I’ve learned along the way for making a coconut cream pie that turns out beautifully every time.
FAQ
Why is my coconut cream pie runny?
To avoid a runny coconut cream pie, make sure the pie crust is fully baked so it doesn’t absorb moisture and become soggy once the custard is added. It’s also important to cook the custard long enough for the cornstarch to fully activate and properly thicken the filling. Finally, the pie needs several hours in the refrigerator to chill and fully set before slicing.
Do you need to refrigerate coconut cream pie?
Yes, coconut cream pie should be kept refrigerated. Since this recipe uses stabilized whipped cream, the pie will stay fresh in the refrigerator for 3 to 4 days. For the best texture and freshness, I recommend storing it in an airtight pie carrier or covered with a large cake dome to prevent the whipped cream from drying out.
Why use stabilized whipped cream on coconut cream pie?
This recipe uses stabilized whipped cream for the topping. Stabilizing the whipped cream with cream cheese adds structure, helping prevent it from deflating or becoming watery in the refrigerator (also known as weeping). You can skip this step if you plan to serve the pie immediately after topping it with whipped cream.
Should coconut be toasted for coconut cream pie?
Though technically not necessary, I recommend toasting the coconut for coconut cream pie because it intensifies the flavour of the coconut and adds great texture!
Can I make coconut cream pie ahead of time?
Absolutely! Coconut cream pie is actually best made ahead since the filling needs several hours to chill and fully set before serving, ideally overnight. Once the custard filling has been added to the fully baked pie crust and covered with plastic wrap, the pie can be refrigerated for 1 to 2 days before adding the whipped cream topping and serving.

Blind Baking the Pie Crust
Note: This recipe uses half (i.e. one dough round) of my Flaky Pie Crust recipe (I usually freeze the other half for later). You can skip this section if using a store-bought crust and just follow the package instructions to fully blind bake the crust — not a partial bake!
After the pie dough has chilled, place one round of dough on a lightly floured surface and roll it out into a circle with a 1- to 1 ½-inch overhang for a 9-inch pie plate. Be sure to keep rotating the dough to prevent sticking.
Carefully transfer the rolled-out dough onto the pie plate and gently press into the bottom edges of the dish, again ensuring there is about 1 to 1 ½ inches of overhang.
Fold the outside edge of dough under itself to form a thicker outer rim of crust, pressing firmly and shaping as desired.
Chill the shaped pie crust in the freezer for 20 minutes.

In the meantime, preheat your oven to 425℉.
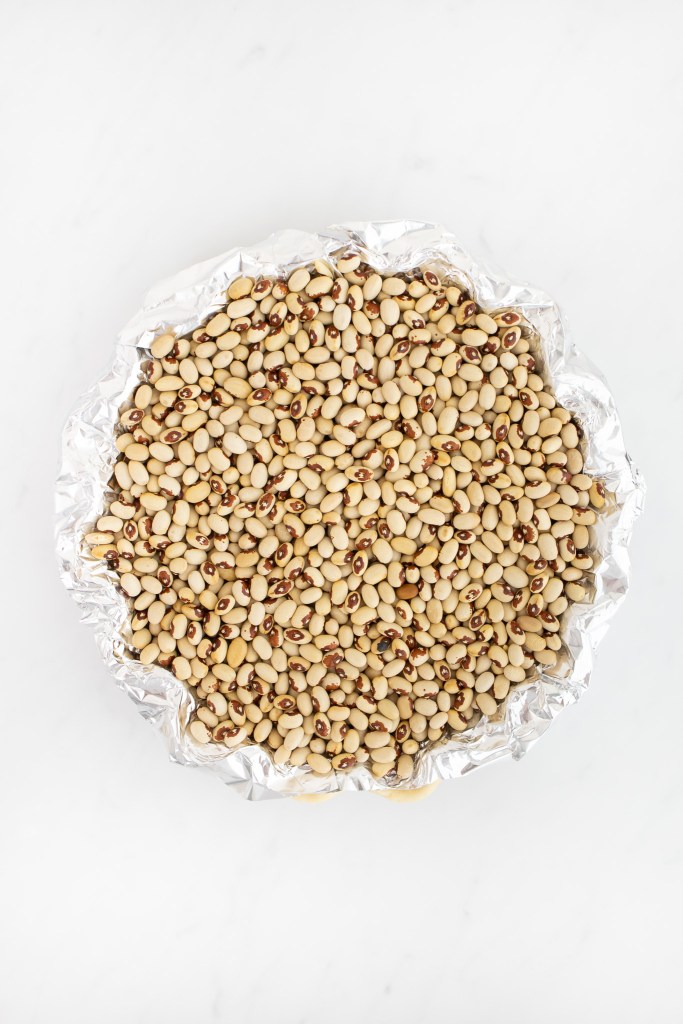
When your oven has preheated, remove your chilled pie crust from the freezer and line the crust with aluminum foil, pressing it gently against the surface of the dough and covering as much of the crust as possible. Using pie weights, dried beans, or rice, weigh down the aluminum foil, filling up the crust as much as possible and pressing the weights gently into all of the edges.
Bake the crust for 20 to 25 minutes, until the outer edges have set and have turned light golden brown in color — you can always lift up the edge of the foil to check!
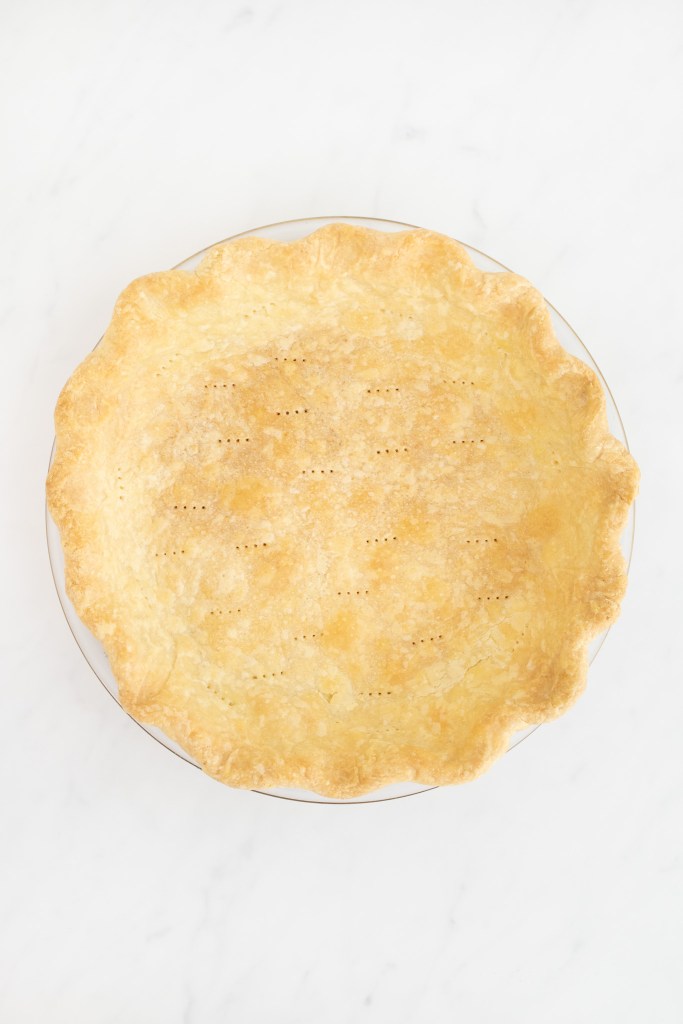
Carefully remove the foil and pie weights, prick the bottom and sides of the crust with the tines of a fork, and return it to the oven to bake for another 10 to 15 minutes, until the crust is fully baked and golden brown.
Pro tip: Keep an eye on the crust in the first few minutes. If it begins to puff up, remove it from the oven, and prick it again with a fork to allow the steam to escape. Additionally, if the crust begins to brown too quickly along the outer edge, you can loosely cover any of those areas with small pieces of aluminum foil.
When the crust has finished baking, remove it from the oven and place it on a wire rack to cool while continuing through the recipe.
Toasting the Coconut
Note: Though the filling only requires 1 cup of toasted coconut, I recommend toasting 1 ½ cups to account for additional topping on your finished pie.
Preheat your oven to 350℉.
Place the coconut in a single layer on an unlined baking sheet.

Toast the coconut in the centre of your preheated oven for 4 minutes. Remove it from the oven, stir the coconut with a wooden spoon, and then shake the pan to redistribute the coconut back into a single layer.
Place the coconut back into the oven and repeat this process every 2 to 3 minutes, until the coconut is fragrant and light golden brown in color. Keep a close eye on it — it should only take 7 to 10 minutes in total!
Once toasted, place the baking sheet on a wire rack to allow the coconut to cool completely.

Preparing the Filling
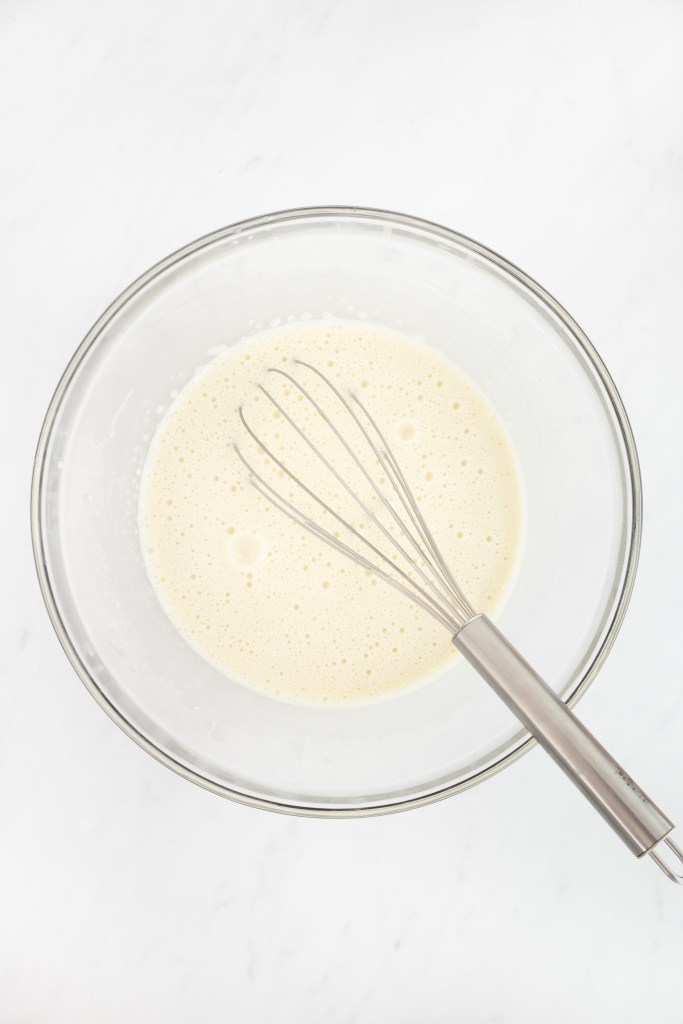
In a large bowl, whisk together the sugar and cornstarch until no lumps of cornstarch remain.
Add in the egg yolks and whisk until the mixture is pale yellow and forms a slowly dissolving ribbon on the surface when you lift your whisk out of the mixture. Set aside.

In a heavy-bottomed sauce pan, whisk together the coconut milk, half-and-half, and salt until combined. Place the mixture over medium-low heat until tepid.

Whisking constantly, slowly pour the tepid coconut milk into the large bowl with the egg yolk mixture — just a few dribbles at a time (at first), so as not to heat the egg yolks too quickly and cause the mixture to curdle!
Transfer the egg yolk/coconut milk mixture back into the saucepan and return it to medium-low heat. Whisking constantly, cook the mixture until it becomes very thick and begins to bubble. (You can stop whisking momentarily to check if the mixture is bubbling.) Continue to cook the mixture for 1 to 2 minutes after it begins to bubble.
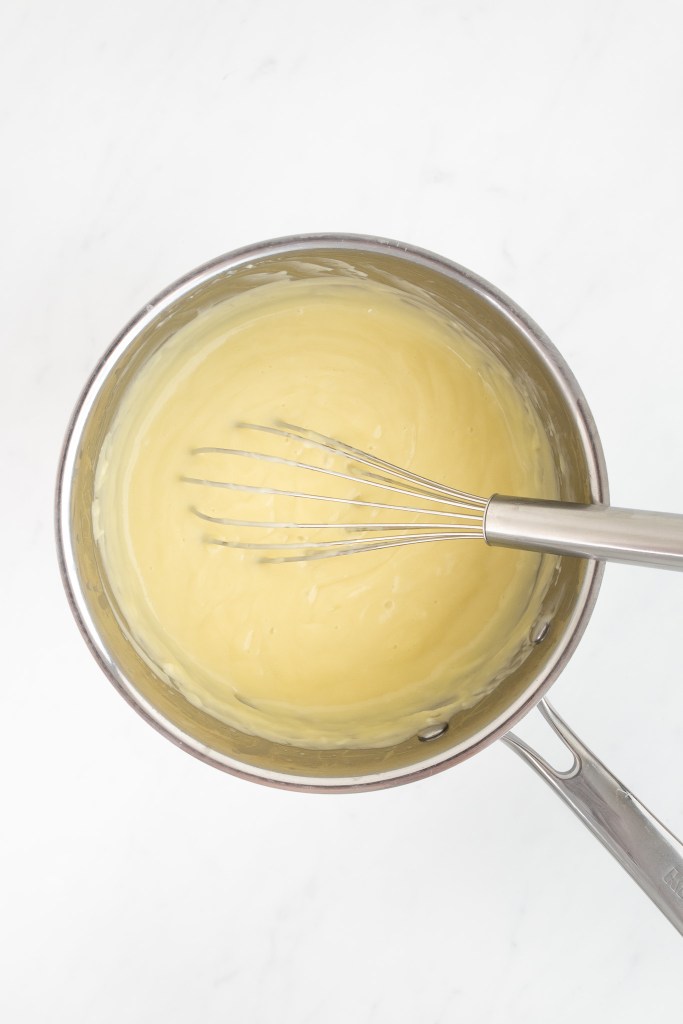
Once it has bubbled for 1 to 2 minutes, remove the saucepan from heat and immediately stir in the chilled, cubed butter. Continue whisking until all of the butter has dissolved.
Next, stir in the vanilla and toasted coconut.
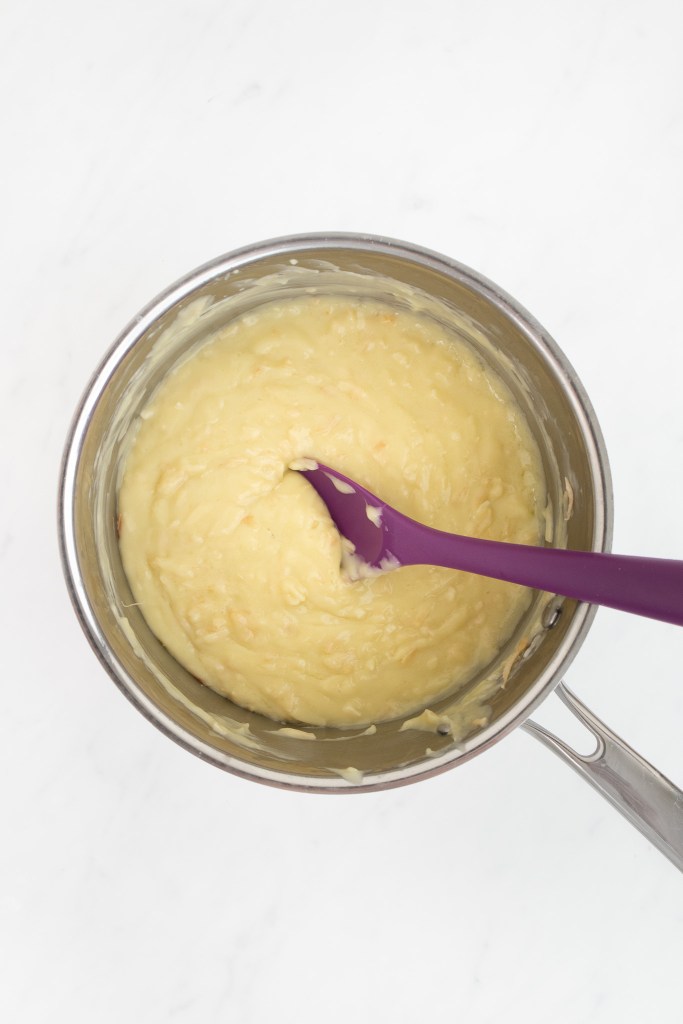
Pour the finished filling into your baked pie crust. Smooth the surface with the back of a spoon and then place a piece of plastic wrap directly on the surface of the filling to prevent a skin from forming as it sits. Allow to cool on a cooling rack for 30 minutes before transferring it to the fridge to chill for at least 3 hours (but ideally overnight).

Preparing the Stabilized Whipped Cream
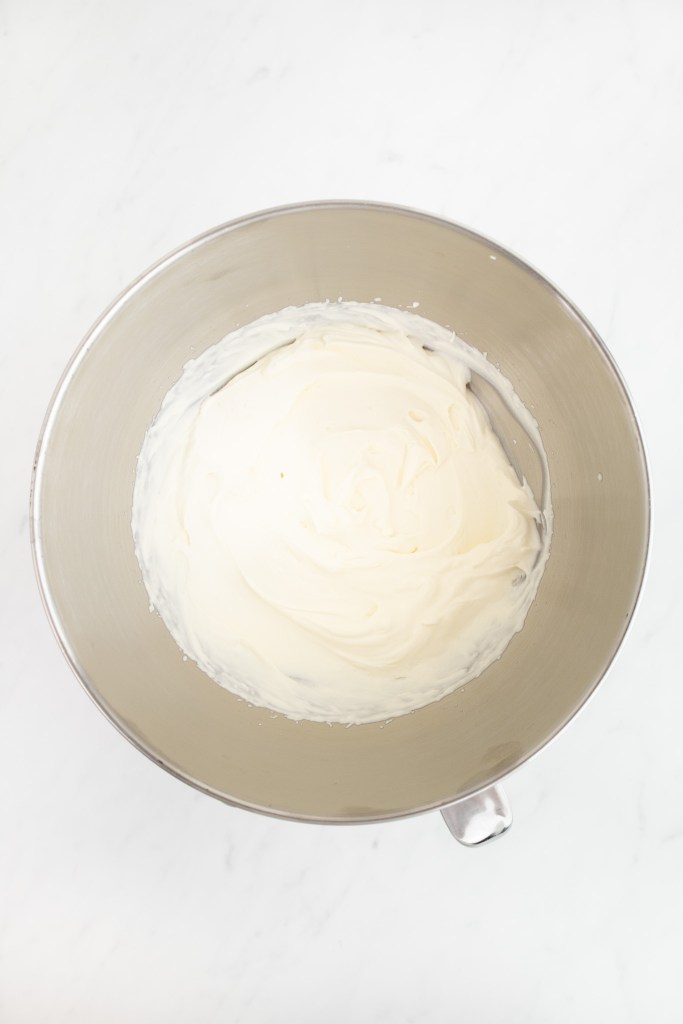
In the bowl of a stand mixer (or in a large bowl if using an electric hand mixer), beat the chilled cream cheese until it is smooth and no lumps remain.
Add in the vanilla, followed by the powdered sugar (one tablespoon at a time), until the mixture is smooth and resembles the consistency of cream cheese frosting.
Add in the cream and continue to beat until the whipped cream forms medium-firm peaks. Remember, you want the whipped cream to be able to hold its shape on top of the pie!
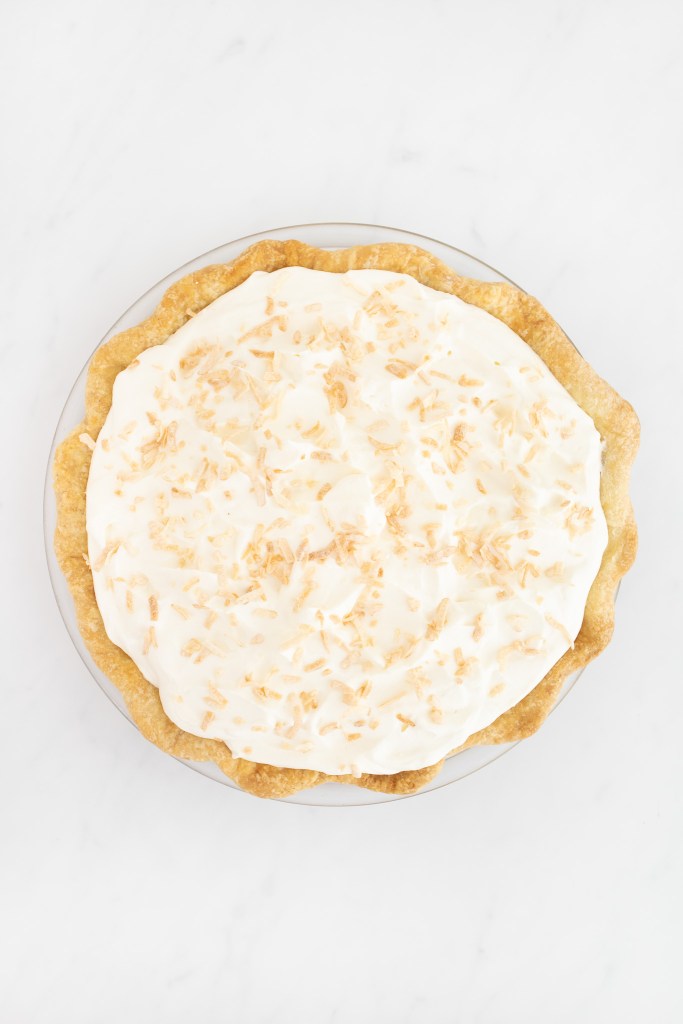
Pour the whipped cream over the top of your chilled pie filling, spreading it around with the back of a spoon.
Sprinkle the top with additional toasted coconut. Serve immediately or keep refrigerated for up to 4 days.
Classic Coconut Cream Pie

Ingredients
For the Pie Crust
- Pie dough (click here for my homemade Flaky Pie Crust recipe; or use store-bought)
For the Filling
- 1 cup sweetened shredded coconut (plus more for topping)
- ½ cup granulated sugar
- ¼ cup cornstarch
- 5 large egg yolks
- 13.5 oz (400 mL) unsweetened coconut milk
- 1 cup half-and-half, or whole milk
- ¼ tsp kosher salt (I use Diamond Crystal)
- 2 Tbsp unsalted butter, chilled and cut into ½" cubes
- 1 tsp pure vanilla extract
For the Stabilized Whipped Cream
- ¼ cup full-fat cream cheese, chilled
- ½ tsp pure vanilla extract
- 3 Tbsp powdered (icing) sugar
- 1 ½ cup heavy cream, chilled
Instructions
Blind Baking the Pie Crust
- Note: This recipe uses ½ (one dough round) of my Flaky Pie Crust recipe (I usually freeze the other half for later). If using a store-bough crust, skip this section and follow the package instructions to fully blind bake the crust (not a partial bake).
- After the pie dough has chilled, place one round of dough on a lightly floured surface and roll it out into a circle with a 1" to 1 ½" overhang for a 9” pie plate. Rotate the dough as needed to prevent sticking.
- Carefully transfer the rolled-out dough onto the pie plate and gently press it into the bottom and sides of the dish, ensuring there is still about 1" to 1 ½" of overhang.
- Fold the outside edge of dough under itself to form a thicker outer rim, pressing firmly and shaping as desired.
- Chill the shaped pie crust in the freezer for 20 minutes.
- Meanwhile, preheat the oven to 425℉.
- Once the oven is preheated, remove the chilled pie crust from the freezer. Line the crust with aluminum foil, pressing it gently against the surface of the dough and covering as much of the crust as possible. Fill the foil with pie weights, dried beans, or rice, pressing the weights gently into all edges of the crust.
- Bake until the outer edges have set and have turned light golden brown (about 20 to 25 minutes). (Carefully lift the foil to check if needed.)
- Carefully remove the foil and pie weights. Prick the bottom and sides of the crust with the tines of a fork, then return it to the oven to bake until the crust is fully baked and golden brown (about 10 to 15 minutes longer).Pro tip: Keep an eye on the crust during the first few minutes. If it begins to puff up, remove it from the oven and prick it again with a fork to allow the steam to escape. If the edges of the crust begin to brown too quickly, loosely cover any of those areas with small pieces of aluminum foil.
- Transfer the baked crust to a wire rack and allow it to cool while toasting the coconut and preparing the filling.
Toasting the Coconut
- Preheat the oven to 350℉.
- Spread 1 ½ cups sweetened shredded coconut into a single layer on an unlined baking sheet.Note: Although the filling only requires 1 cup of toasted coconut, I recommend toasting 1 ½ cups to allow extra for topping.
- Toast the coconut in the center of the oven for 4 minutes. Remove from the oven, stir with a wooden spoon, then shake the pan to redistribute the coconut back into a single layer.
- Return the coconut to the oven and repeat this process every 2 to 3 minutes until the coconut is fragrant and light golden brown. (Keep a close eye on it, as coconut can burn quickly; the total baking time should be about 7 to 10 minutes.)
- Transfer the baking sheet to a wire rack and allow the coconut to cool completely.
Preparing the Filling
- In a large bowl, whisk together the sugar and cornstarch until no lumps remain.½ cup granulated sugar¼ cup cornstarch
- Add in the egg yolks and whisk until the mixture is pale yellow and forms a slowly dissolving ribbon on the surface when the whisk is lifted out of the mixture. Set aside.5 large egg yolks
- In a heavy-bottomed sauce pan, whisk together the coconut milk, half-and-half, and salt until combined. Heat over medium-low until tepid.13.5 oz (400 mL) unsweetened coconut milk1 cup half-and-half, or whole milk¼ tsp kosher salt
- Whisking constantly, slowly pour the tepid coconut milk mixture into the large bowl with the egg yolk mixture, adding just a few dribbles at a time at first to prevent the eggs from curdling.
- Transfer the mixture back into the saucepan and return it to medium-low heat. Cook, whisking constantly, until it becomes very thick and begins to bubble. (You can stop whisking momentarily to check if the mixture is bubbling.) Continue cooking the mixture for 1 to 2 minutes after it begins to bubble.
- Once the mixture has bubbled for 1 to 2 minutes, remove it from the heat and immediately stir in the chilled, cubed butter, whisking until fully melted and incorporated.2 Tbsp unsalted butter, chilled and cut into ½" cubes
- Stir in the vanilla and 1 cup of the toasted coconut.1 tsp pure vanilla extract
- Pour the filling into the baked pie crust and smooth the surface with the back of a spoon. Press a piece of plastic wrap directly onto the surface of the filling to prevent a skin from forming as it sits.
- Allow the pie to cool on a wire rack for 30 minutes, then chill in the refrigerator for at least 3 hours, but ideally overnight.
Preparing the Stabilized Whipped Cream
- In the bowl of a stand mixer (or in a large bowl, if using an electric hand mixer), beat the chilled cream cheese until it is smooth and no lumps remain.¼ cup full-fat cream cheese, chilled
- Add in the vanilla, followed by the powdered sugar, one tablespoon at a time, beating until smooth and resembling the consistency of cream cheese frosting.½ tsp pure vanilla extract3 Tbsp powdered (icing) sugar
- Pour in the cream and continue beating until the whipped cream forms medium-firm peaks. (It should be sturdy enough to hold its shape on top of the pie.)1 ½ cup heavy cream, chilled
- Pour the whipped cream over the chilled pie filling and spread it around with the back of a spoon.
- Sprinkle the top with additional toasted coconut, as desired. Serve immediately or refrigerate for up to 4 days.