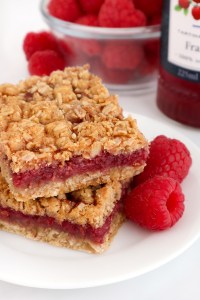
I won’t lie to you: classic puff pastry is difficult and finicky. It takes a few hours and a lot can go wrong along the way. It will take a bit of practice to learn and master the technique; however, if you’re like me (and love challenging yourself to learn new skills and techniques), it’s totally worth it! That being said, most times I will save myself the trouble and use a really good all-butter puff pastry from the grocery store and only do the homemade version for special occasions.
I remember watching Julia Child make puff pastry on The French Chef, encouraging us not to be scared of it while beating her dough with a broom handle that her husband had fashioned into a giant rolling pin. With her encouragement, I decided to give it a try and boy did it ever go wrong. I distinctly remember those first few attempts ending in exhaustion and everything in my entire tiny kitchen — myself included — being covered in butter and flour.
Even now, I still worry each time I make homemade puff pastry. As I mentioned, so much can go wrong and care has to be taken at each step: the dough needs to be properly hydrated, everything needs to be kept chilled at a particular temperature and consistency… But, it is SO rewarding when it comes out perfect. Just remember to take your time, and to keep putting the dough into the fridge to stay chilled and rested throughout the process.
How is puff pastry made?
The life of puff pastry begins as what is called a “détrempe” (pronounced “day-tromp”). This is a simple base dough made from flour, water, salt, sugar, and a small amount of butter. A block of butter — called a “beurrage” — is then encased in the dough, and the whole thing is rolled out and goes through a number of folds or “turns” in such a way as to create thin layers of butter between thin layers of dough. This process is called “lamination”. That butter creates steam in a hot oven, causing the dough to puff up, which leads to all those crispy layers.
How many “turns” does puff pastry need?
When making puff pastry, you complete three sets of two tri-fold “turns”, for a total of six turns. You will need to allow the dough to rest after each set of turns so it can chill and relax. When using all-purpose flour, dough becomes elastic when handled and rolled out, and it is often a struggle to roll out the dough to the correct shape/size without it springing back. Many recipes call for 20 minutes of resting time between each set of turns, but I usually do an hour just to be sure to give the dough (and me) enough time to rest.
Words of encouragement
This is less of a recipe than it is a guide to help you learn the technique. I tried to include steps and photos that demonstrate what I do to set myself up for the most success when making puff pastry. Don’t be discouraged if it doesn’t come out perfect on your first attempt. You may have to give it a few tries to get it right!

Preparing the Détrompe (Base Dough)
To prepare the détrompe (base dough), add the dry ingredients into the bowl of a stand mixer fitted with the paddle attachment and mix on low speed for 30 seconds to combine.
Add 4 Tablespoons of chilled, ¼” cubed butter.

Beat on medium speed for about 3 minutes (it’s longer than you think), until no lumps of butter remain, and the mixture has a sandy texture.
Turn the mixer down to low speed and slowly pour in the water until the dough just comes together. Note that the dough should appear fairly dry. If large patches of the flour mixture remain, add a few drops more water and finish mixing by hand.

Dump the dough out onto a very lightly floured surface and form it into a mass by pressing it together firmly with both hands.
Gently knead the dough until it forms a smooth mass. Be careful not to over-knead the dough!
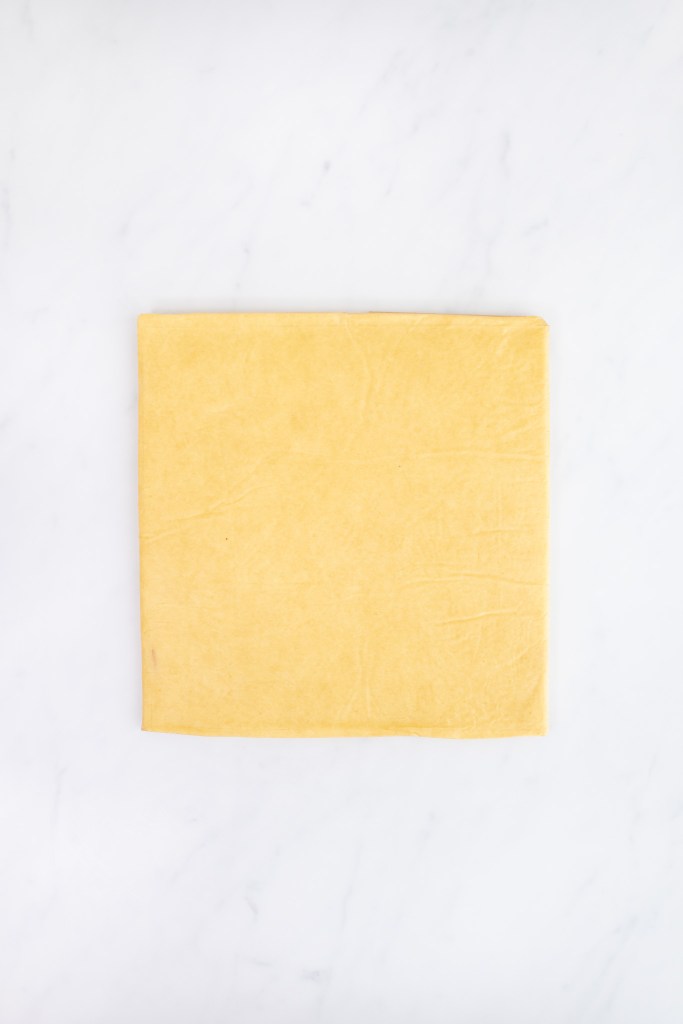
Wrap the dough in plastic wrap and place it in the fridge to relax and chill while preparing the butter block.

Preparing the Beurrage (Butter Block)
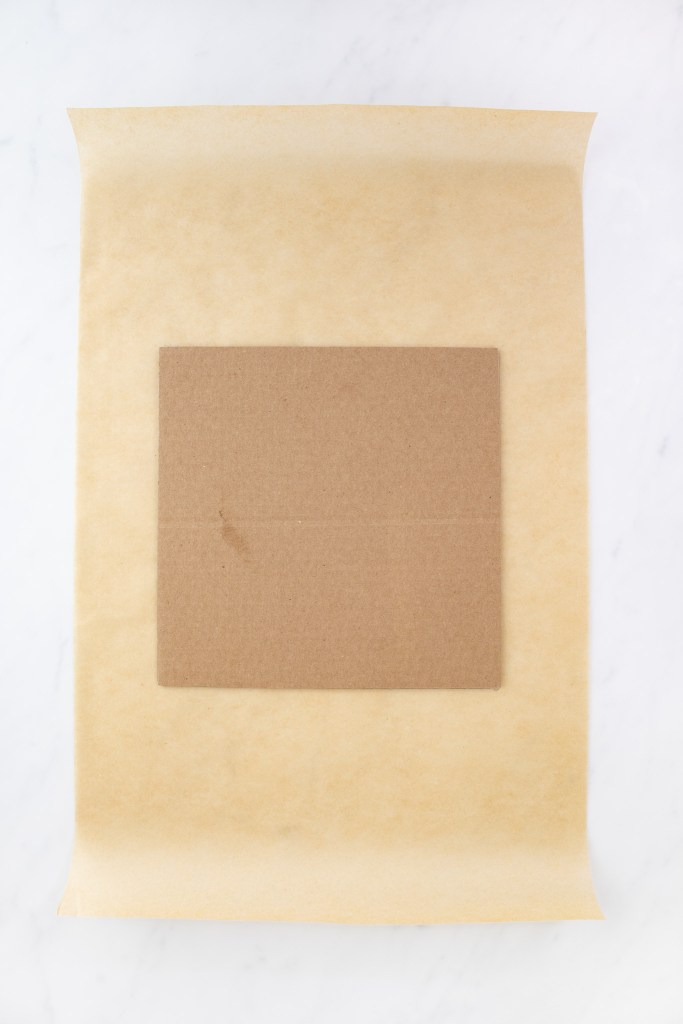
To prepare the beurrage (butter block), start by tracing an 8” square in the center of a piece of parchment paper about 18 inches long. I use a cut out piece of cardboard to make it easier.
Pre-fold the parchment paper along the lines of the 8” square, being sure to keep any pencil marking on the underside of the paper so as not to get any into your butter (later on).


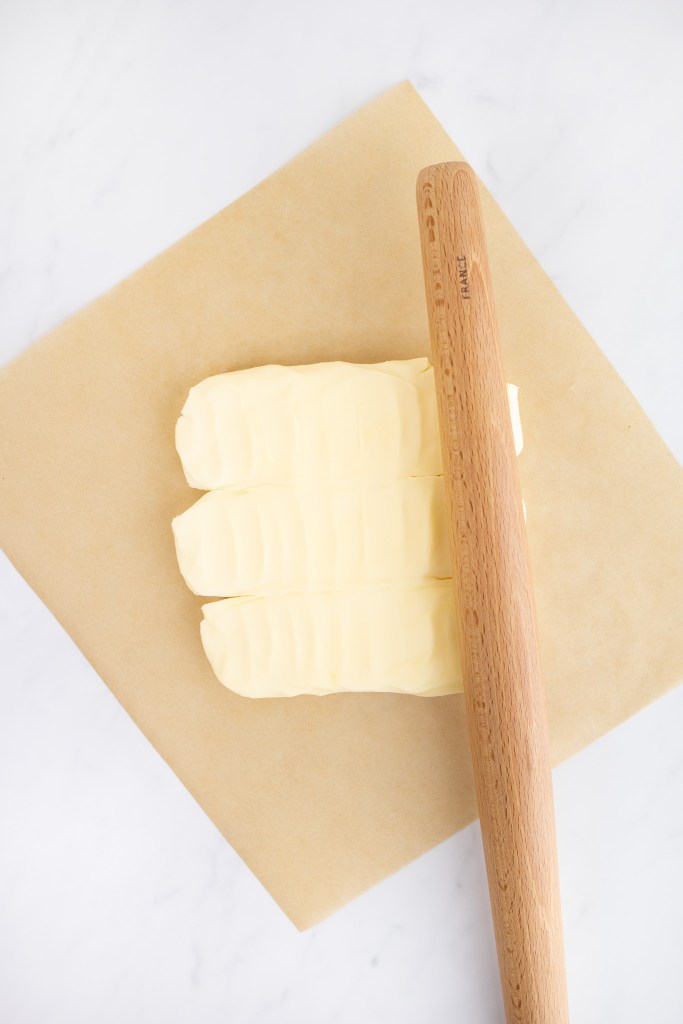
Beat the chilled butter with a rolling pin until it is malleable, but still chilled. (I like to do this on a separate piece of parchment paper.)
Place the chilled butter in the center of the pre-folded parchment paper square and fold the sides of the parchment paper over the butter.

Continue to use your rolling pin to roll and form the butter into an even square, using your fingers to press the butter into the corners. You can then press down on the butter block with a cutting board (or any heavy flat object) to give it a uniform thickness.
Place the whole butter block into the fridge.
Laminating (or Forming) the Dough
Layering and folding the butter into the dough is called “lamination”. To laminate the dough, start by removing the détrempe from the fridge and placing it on a lightly floured surface.
Using your fingers, gently shape the dough into a square shape.
Next, using a rolling pin, continue rolling the dough out into a square about 12” by 12”. To keep the dough in a square shape, start with your rolling pin in the center of the dough and roll out towards each corner in an “X” pattern.
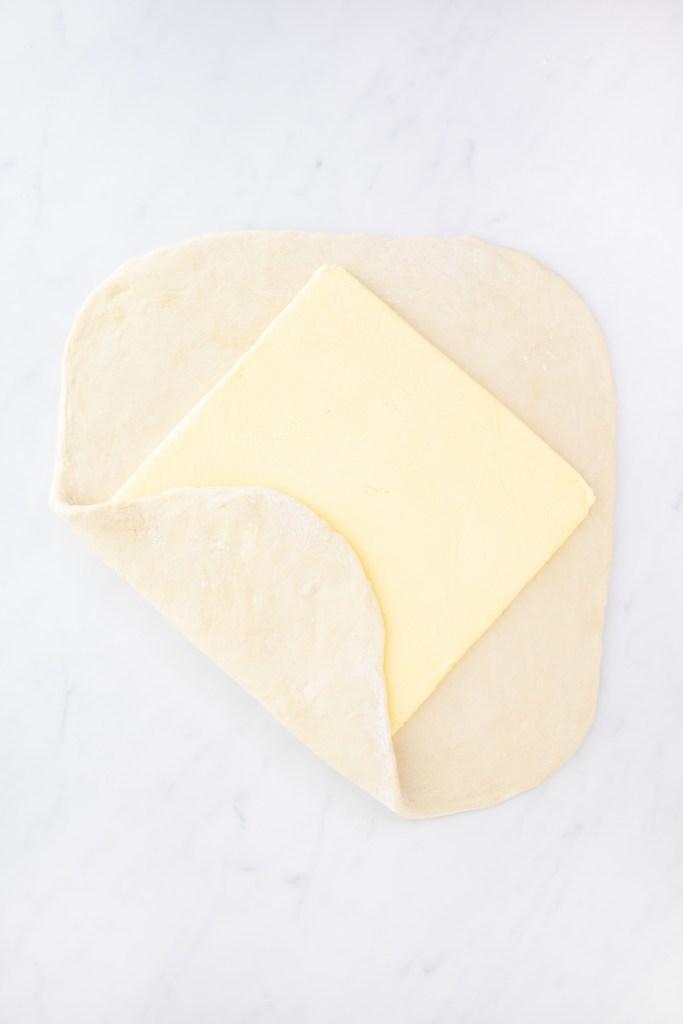
Remove the beurrage (butter block) from the fridge and place in the center of the dough, rotated at a 45-degree angle, like a diamond in a square.

Fold up the edges of dough over the butter block, pressing the edges together to seal in the butter completely. Turn the dough counterclockwise 45 degrees, back to its original position.

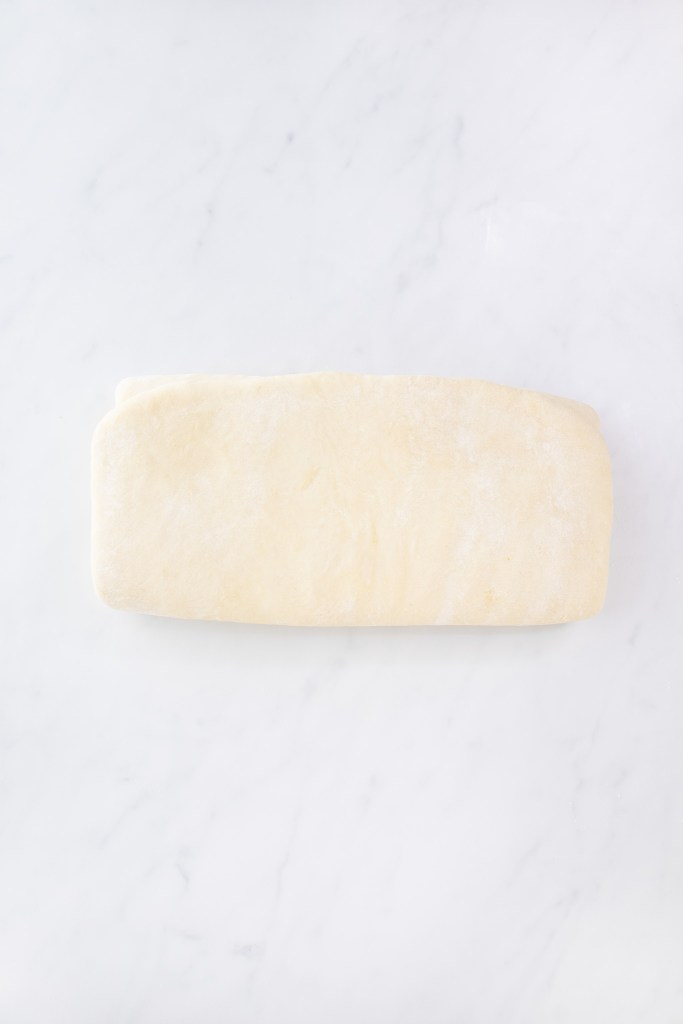
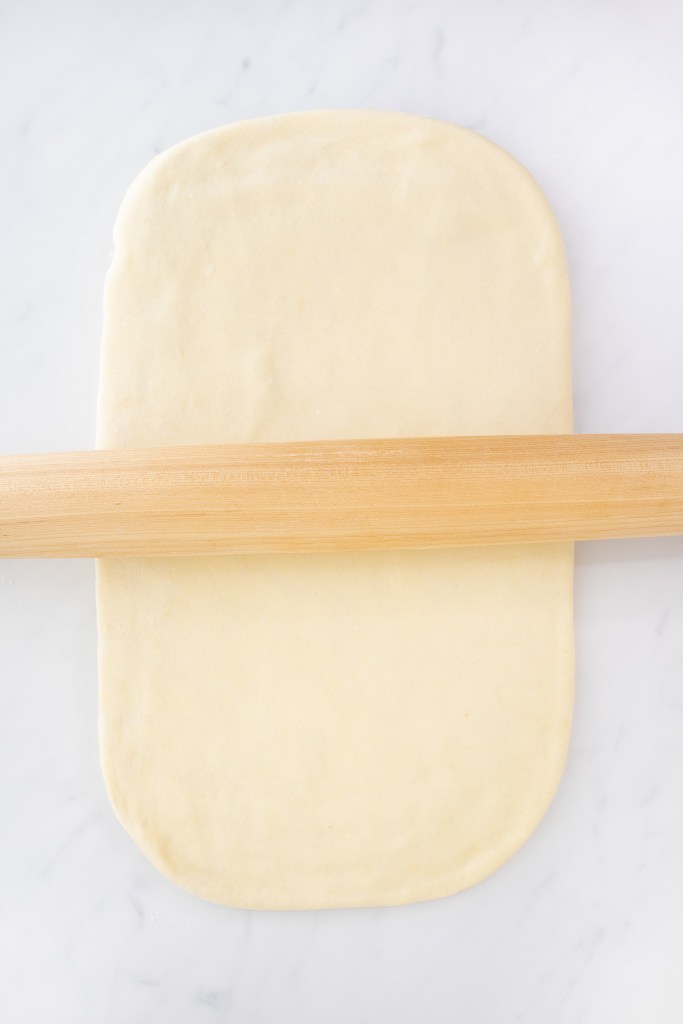
Roll the dough out into a rectangle at least twice as long as it is wide (about 20” by 10”), maintaining a rectangular shape as much as possible.

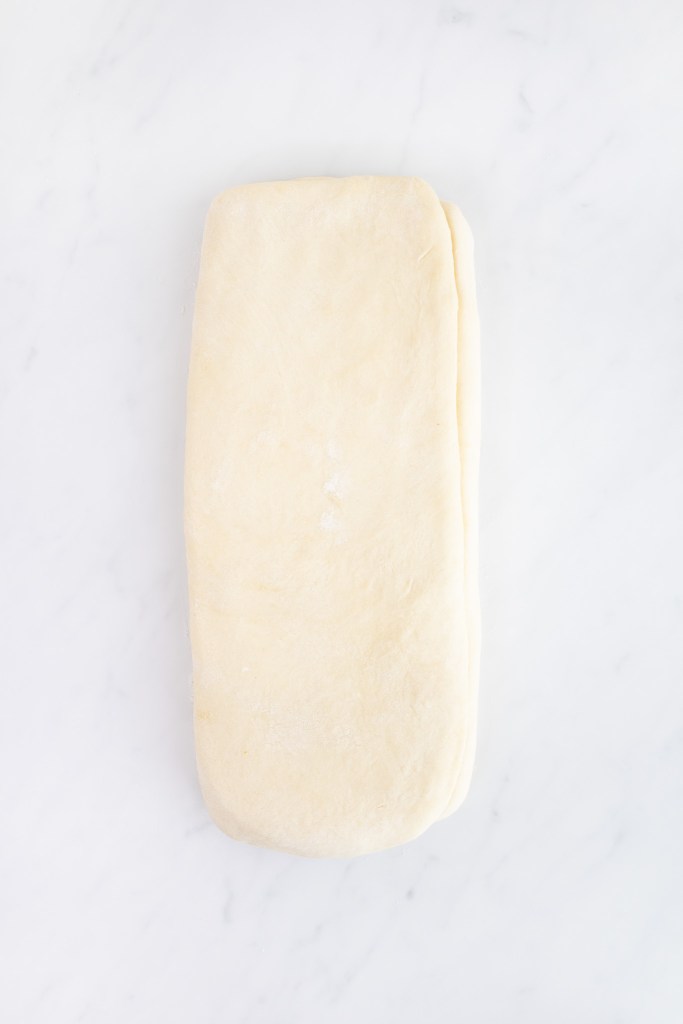
Fold the dough in thirds like a business letter, starting with the top third, followed by the bottom third.

Rotate the dough ¼ turn to the right (like how you would open a book). This folding and rotating process is called a “turn”.
Roll the dough out again into a rectangle at least twice as long as it is wide (again, about 20” by 10”) and fold it, once again, in thirds like a business letter. This is the second turn.

Wrap the dough in plastic wrap and place it in the fridge to rest and chill for at least one hour.
After one hour, remove the dough from the fridge and repeat the process to make two additional turns.
Wrap the dough in plastic wrap again and let it rest in the fridge for another hour.
Remove it from the fridge and complete two additional turns — that should result in six total turns. Return the dough back to the fridge for its final one-hour rest.
At this point, the dough can now be baked into puff pastry or stored in the refrigerator or freezer for future use.
Baking the Puff Pastry
To bake the puff pastry, roll the dough out into a rectangle about 18” by 12”. The dough should be between a ¼” and a ⅛” thickness.
Trim off ¼” from all four sides of the rolled-out dough. If the edges of the dough are not trimmed, the folded edges will prevent the dough from properly puffing in the oven.

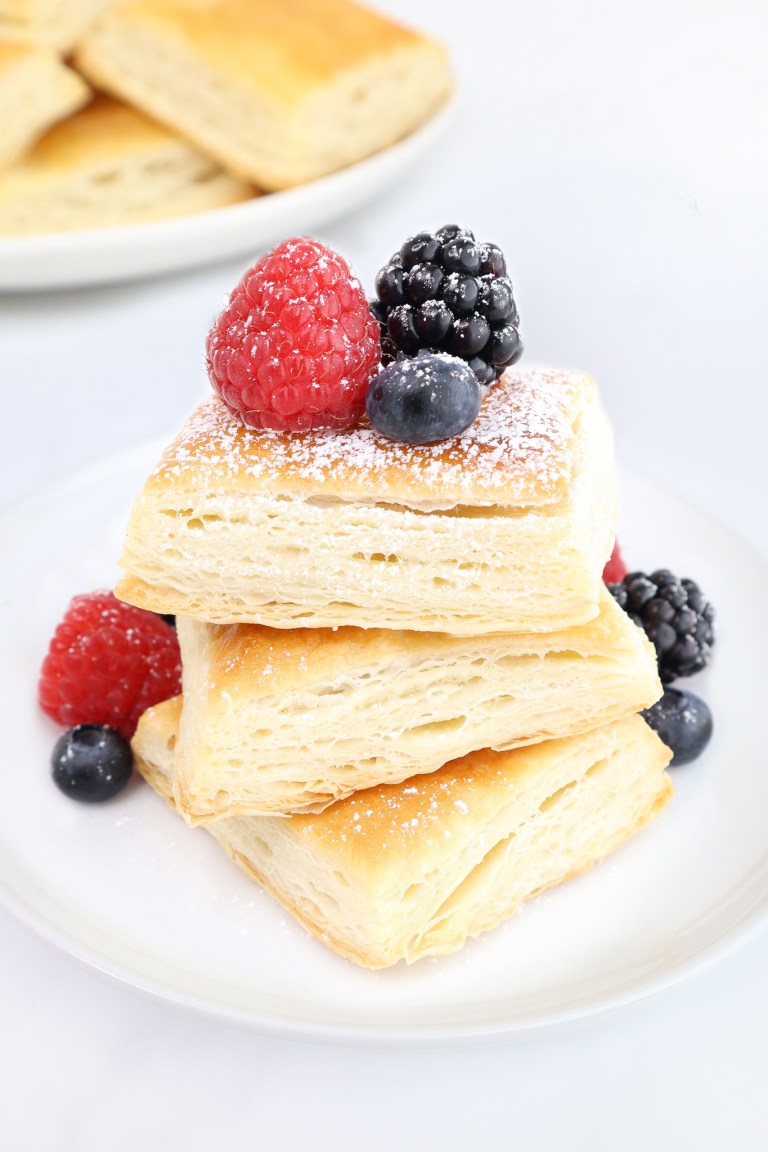
Cut the dough into your desired size(s) and shape(s), based on whatever recipe you are following. Then, simply bake as directed.
Storing the Puff Pastry
To save and store any remaining dough, carefully fold it back up like a business letter, wrap it in plastic wrap or a resealable plastic bag, and refrigerate. Puff pastry can be refrigerated for up to a few days before it needs to be used.
Puff pastry dough can be frozen for six months or even longer. To use from frozen, thaw it out in the fridge overnight.
Traditional Puff Pastry (Pâte Feuilletée)
Ingredients
For the Détrempe (Base Dough)
- 3 ½ cups all-purpose flour
- 2 Tbsp granulated sugar
- 1 ½ tsp kosher salt (I use Diamond Crystal)
- 1 cup cold water
- 4 Tbsp unsalted butter, chilled
For the Beurrage (Butter Block)
- 1 ½ cups (3 sticks) unsalted butter, chilled
Instructions
- Note: I highly encourage you to scroll up and look through the step-by-step photos above to help guide you along the way.
Preparing the Détrompe (Base Dough)
- In the bowl of a stand mixer fitted with the paddle attachment, add in the flour, sugar, and salt. Mix on low speed until combined (about 30 seconds).3 ½ cups all-purpose flour2 Tbsp granulated sugar1 ½ tsp kosher salt
- Cut the butter into ¼" cubes and add into bowl.4 Tbsp unsalted butter, chilled
- Mix on medium speed until no lumps of butter remain, and the mixture has a sandy texture (about 3 minutes — longer than you think).
- Reduce the mixer to low speed and slowly add in the cold water. Mix just until the dough comes together (about 20 seconds). Note: the dough should still be fairly dry; if there is still loose flour in the mixture, add in a few drops more water and finish mixing by hand.1 cup cold water
- Pour out the dough on a lightly floured surface. Compress it into a ball by pressing it together firmly with both hands.
- With your hands, gently knead the dough until it forms a smooth mass. Be careful not to over-knead.
- Wrap the dough in plastic wrap. Set it in the refrigerator to chill while preparing the butter block.
Preparing the Beurrage (Butter Block)
- Prepare a piece of parchment paper about 18" long. In the center, trace an 8" square. (Tracing around a cut-out 8" piece of cardboard works well.)
- Turn the parchment paper over (so any pen/pencil marks don't get into the butter) and pre-fold all four sides of the parchment paper along the drawn lines.
- With a rolling pin, whack the chilled butter until it is malleable and spreadable, but still cold.1 ½ cups (3 sticks) unsalted butter, chilled
- Place the butter into the center of the traced-out square and fold all four sides of the parchment paper up over the butter. Using the rolling pin, continue to roll out and form the butter into a square, pressing the butter into the corners with your fingers. With a cutting board (or any heavy flat object), press down on the butter block to ensure uniform thickness.
- Set the entire parchment paper "package" (containing the butter block) in the refrigerator.
Laminating (or Forming) the Dough
- Remove the détrempe (base dough) from the refrigerator and set it on a lightly floured surface.
- Using your fingers, gently shape the dough into a square shape.
- Using a rolling pin, roll the dough out into a 12" square.Pro tip: To keep the dough in a square shape, roll the dough from its center out towards each corner, in an "X" pattern.
- Remove the beurrage (butter block) from the refrigerator and place it in the center of the dough at a 45° angle (so it looks like a diamond in a square).
- Fold the edges of the dough up over the butter block, pressing the edges together to completely seal in the butter. Turn the dough back 45° to its original orientation.
- With the rolling pin, roll out the dough (seam-side up) into a rectangle at least twice as long as it is wide (about 20" by 10").
- Fold the dough horizontally in thirds like a business letter: fold the top third down, followed by the bottom third up.
- Rotate the dough 90° clockwise (i.e. a ¼ turn to the right), as if the dough was a book that could be opened. This folding and rotating process is called a "turn".
- Once again, roll out the dough into a rectangle at least as twice as long as it is wide (about 20" by 10") and repeat the folding process. This is the second turn.
- Wrap the dough in plastic wrap. Place the wrapped dough in the refrigerator until it is chilled and well rested (at least 1 hour).
- Remove the dough from the refrigerator and repeat the above folding process to make two additional turns. Wrap the dough in plastic wrap (the same piece is fine) and let it rest in the refrigerator for at least another hour.
- Repeat the folding process one more time to make two additional turns (six turns in total). Return the dough to the refrigerator to chill for at least one more hour. Afterwards, the dough can be baked into puff pastry or stored in the refrigerator or freezer for future use.
Baking the Puff Pastry
- With a rolling pin, roll out the dough into a ¼" to ⅛" thickness (about 18" by 12").
- Trim off about ¼" on all four sides. (This takes off the folded edges to ensure that it puffs properly in the oven.)
- Cut dough into desired shape(s), according to whichever recipe you are using. Bake as directed.
- To save and store any remaining dough, carefully fold it back up like a business letter, wrap it in plastic wrap or a resealable plastic bag, and refrigerate.
Storing the Puff Pastry
- To store puff pastry, refrigerate for up to several days or freeze for up to six months. To use from frozen, allow dough to thaw in the refrigerator overnight.