Authentic French Bakery-Style Croissants
These incredibly flaky, buttery croissants are just like the ones you'd find at a traditional French bakery. While not a "quick and easy" bake, this recipe provides step-by-step instructions for making authentic croissants, along with a helpful guide to overcoming some of the most common challenges. It’s the perfect weekend project — not only will you get to enjoy delicious, bakery-style croissants, but you'll also gain valuable baking skills you can take pride in.

Ingredients
For Proofing the Yeast
- ½ cup water, tepid
- 1 Tbsp granulated sugar
- 2 ¼ tsp active dry yeast (1 packet)
For the Croissant Dough (Détrempe)
- Proofed yeast mixture (as prepared in this recipe)
- 4 ½ cups (563 g) unbleached all-purpose flour (sifted and leveled)
- 1 Tbsp kosher salt (I use Diamond Crystal)
- ¼ cup granulated sugar
- ½ cup water, at room temperature
- ½ cup whole milk, at room temperature
- ¼ cup (½ stick) unsalted butter, chilled and cut into ½" cubes
For the Butter Block (Beurrage)
- 1 ½ cups (3 sticks) European-style unsalted butter (see Note 2)
For the Egg Wash
- 1 egg yolk
- 1 Tbsp heavy cream, or whole milk
Equipment
- 2 Half Sheet Pans (I like these)
Instructions
--- DAY ONE (8 hours) ---
Proofing the Yeast
- Before beginning, check the expiry date on the packet of yeast to ensure that it has not expired.
- In a small bowl, with a fork, whisk together tepid water, sugar, and yeast. Allow to sit at room temperature until the yeast granules have all dissolved and the mixture has begun to foam (at least 5 minutes).½ cup water, tepid1 Tbsp granulated sugar2 ¼ tsp active dry yeast
Preparing the Croissant Dough (Détrempe)
- In the bowl of a stand mixer, whisk together flour, salt, and sugar. (Note: to measure the flour, I recommend either using a kitchen scale to weigh it, or sifting the flour into the measuring cup and levelling it off with the back of a knife.)4 ½ cups (563 g) unbleached all-purpose flour1 Tbsp kosher salt¼ cup granulated sugar
- Using the dough hook attachment, with the mixer on low speed, pour in water, milk, and proofed yeast mixture.½ cup water, at room temperature½ cup whole milk, at room temperatureProofed yeast mixture
- Mix on low until the dough just comes together (with no dry patches of flour remaining), scraping down the sides of the bowl as necessary. The dough will appear dry at first, but should come together after about 5 minutes.Note: At this stage, it is important for the dough to be properly hydrated. Several factors can affect hydration, such as the type/brand of flour, the exact quantity of each ingredient, and even the weather (temperature/humidity). If the dough still appears too dry, add in an additional 1 Tbsp of water (or so). If the dough is too soft or gummy in texture, sprinkle in a bit of extra flour.
- Once the dough has come together, turn the mixer off, cover the bowl with a tea towel, and allow the dough to rest for 10 minutes (the flour will continue to hydrate).
- Once the dough has rested, with the mixer on a medium-low speed, add in chilled, cubed butter. Mix until all of the butter is incorporated into the dough (about 5 to 10 minutes). (At first, it may seem like the butter will not fully incorporate, but it will — just keep mixing!) Continue to mix until the dough is smooth, stretchy, and no longer sticky to the touch.¼ cup (½ stick) unsalted butter, chilled and cut into ½" cubes
- Empty the dough onto a lightly floured surface. Knead it by hand 2 to 3 times, then form it into a smooth ball. Set the dough ball back into the mixing bowl (seam side down), cover the bowl with plastic wrap and a tea towel, and allow the dough to rise at room temperature until it has roughly doubled in volume (about 1 to 1 ½ hours).
- Using your hands, deflate the dough as you empty it back out onto a lightly floured surface. Knead the dough 2 to 3 more times, reform it into a smooth ball, and set it back into the mixing bowl. Cover the bowl (once again) with plastic wrap and a tea towel, then allow the dough to rise in the refrigerator for at least 4 hours (and up to 12 hours).
Preparing the Butter Block (Beurrage)
- Cut a piece of parchment paper to about 18" in length. In the center of the parchment paper, trace a square that is exactly 8” by 8”. Flip the parchment paper over (so the pencil markings won't come into contact with the butter), and place the 3 sticks of chilled, European-style butter side by side in the center of the square. Fold the parchment paper over the butter along the traced lines. Using a rolling pin, beat and roll out the butter until it forms a perfect 8” by 8” square of even thickness.Pro tip: European-style butter has a higher fat content than regular butter, making it more pliable (even when chilled) — ideal for lamination. If you’re struggling to shape the butter into a square, allow it to sit at room temperature for a few minutes so it's still chilled, but not fully softened. Note that the butter will warm up more quickly the thinner you roll it out.

- Chill the butter block in the refrigerator while the dough continues to rise.
Laminating the Dough (one double turn)
- Remove the dough from the fridge and set it on a lightly floured surface. Using your hands, pat the dough down and shape it into a rough square.
- Using a rolling pin, roll out the dough into a square that is at least 10” by 10”, ensuring the edges remain as straight and even as possible. The easiest way to do this is by rolling in an “X” motion, starting from the centre of the dough and rolling out towards each corner.
- Place two pieces of plastic wrap perpendicular to each other and use them to wrap the dough into a rough square. Continue rolling the dough into the corners formed by the plastic wrap, similar to how you formed the butter block (this will help in rolling out the dough into a larger square later).
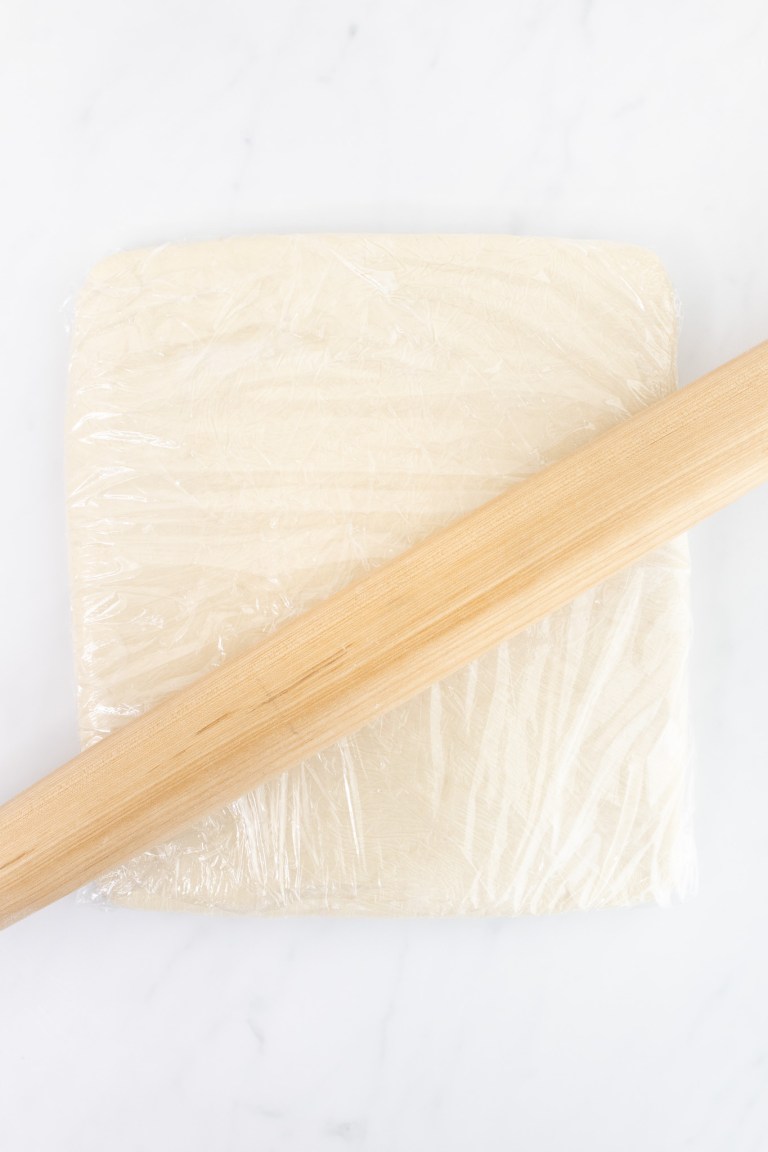
- Place the dough on a cutting board or sheet pan and set it in the freezer for 20 minutes. After 10 minutes, remove your butter block from the fridge and set aside.Note: The goal here is for the dough and butter to be as similar in texture and consistency as possible. Chilling the dough in the freezer helps it firm up slightly to match the firmness of the butter. Likewise, allowing the butter to warm slightly helps it match the softness of the dough. However, keep in mind that the butter must remain chilled, so be sure to work quickly yet carefully.
- After the dough has chilled, remove it from the freezer and unwrap it. Place the dough back on a lightly floured surface and roll it out into a square that is slightly larger than 12” by 12”.
- Unwrap the butter block and place it in the center of the dough, rotated 45 degrees to form a diamond shape. Fold the edges of the dough up and over the butter block, taking extra time and care to stretch and pinch the seams together, ensuring the butter is fully enveloped and won’t leak out when the dough is rolled.

- Roll out the the dough into a rectangle approximately 12” by 18”, again ensuring the edges remain as straight and even as possible. Be sure to lift the dough frequently to prevent it from sticking to the counter.Pro tip: If your dough begins to resist and contract, you can wait a few minutes before continuing to roll it out, but be careful not to wait too long or the butter may get too warm. Alternatively, if the dough becomes too warm, place it on a sheet pan and chill it in the refrigerator for a few minutes before proceeding.
- Using a pastry cutter, pizza cutter, or sharp knife, trim off any rounded edges from both short ends of the rectangle.

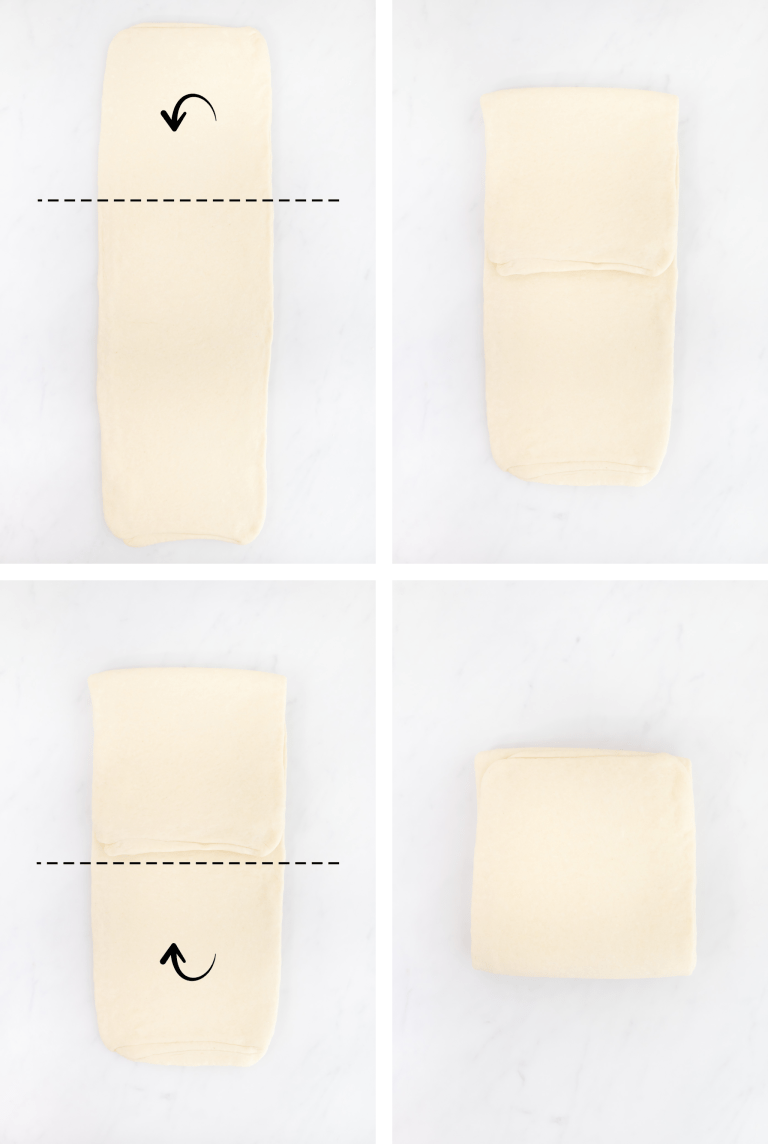
- Fold both short ends up to the centreline of the dough and pinch together the middle seam. Then, fold the dough in half along the middle seam (like closing a book towards you).

- Wrap the dough in plastic wrap and chill it in the refrigerator to rest for 1 hour.
Laminating the Dough Again (one single turn)
- Remove the dough from the fridge and set it on a lightly floured surface. Pat the dough down with your hands and gently pop any air bubbles that may have formed.
- Position the dough in front of you vertically (up and down), then roll it out into a long rectangle approximately 8” by 24”. (Note: If the dough begins to resist, allow it to rest for a few minutes as described above.)
- Fold the dough in thirds lengthwise (like a business letter), wrap it in plastic wrap, and return it to the fridge to chill overnight.
--- DAY TWO (3 hours) ---
Forming the Croissants
- Remove the dough from the fridge and allow it to sit at room temperature for 5 minutes.
- Unwrap the dough and set it on a lightly floured surface. Using your hands, pat down the dough, as it will have puffed up a bit overnight.
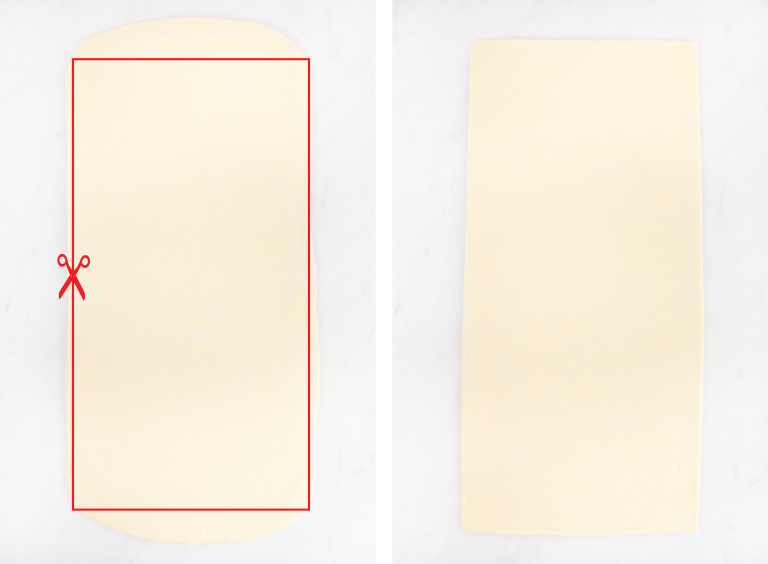
- Roll out the dough into a rectangle approximately 10.5” by 22”, again ensuring the edges remain as straight and even as possible.
- Using a pastry cutter, pizza cutter, or sharp knife, along with a straight edge (like a ruler), trim all four edges to form a clean rectangle, wasting as little dough as possible.
- Cut the rectangle of dough into quarters, lengthwise, forming four equally sized rectangles approximately 5" by 10" (they can be slightly smaller or larger). Cut each smaller rectangle diagonally to form 8 right triangles.

- Cut a small piece off the shorter edge of each right triangle to form 8 isosceles triangles (this will help in rolling the croissants into the proper shape.)

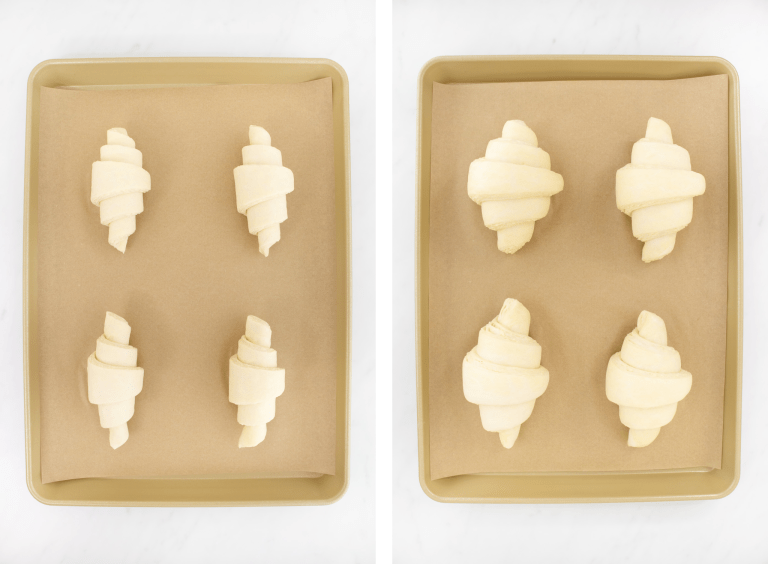
- Starting at the base of the triangle, pull both corners out slightly and then roll the dough tightly towards the tip.
- Place the croissants on two sheet pans lined with parchment paper, resting on their tip ends to prevent unrolling. Cover very loosely with plastic wrap and set them in the oven (with the oven turned off!) to rise for 1 ½ to 2 hours.
Baking the Croissants
- After 2 hours, the croissants should be puffed up and jiggle slightly when the pan is shaken. Remove the pans from the oven and set them in the fridge to chill for 20 minutes.
- In the meantime, preheat your oven to 375℉. In a small bowl, prepare the egg wash by whisking together the egg yolk and heavy cream (or milk). Cover with plastic wrap and refrigerate until ready to use.1 egg yolk1 Tbsp heavy cream, or whole milk
- Working quickly but carefully, remove the croissants from the refrigerator and discard the plastic wrap. Using a pastry brush, paint the smooth top surface (and outer layer) of each croissant with the prepared egg wash, being careful not to get any on the sides (or exposed layers), as it may prevent them from rising properly in the oven.
- Set both sheet pans of croissants in the oven, one in the lower ⅓ and one in the upper ⅓. Bake for 10 minutes. After 10 minutes, swap the pans (top to bottom) and rotate them 180° for even baking, then continue baking until the croissants are golden brown on top (about 8 to 10 minutes more).Note: If you notice butter pooling in the pan while the croissants bake, don’t worry — this can happen, especially if it’s your first time making croissants. They will still turn out great!
- Remove the croissants from the oven and allow them to sit on the pan for 5 minutes before transferring them to a wire rack to cool completely. You can serve croissants fresh from the oven or at room temperature. Once cooled, store them in an airtight container (at room temperature) or in an airtight freezer bag (in the freezer), depending on when you plan to serve them.
Notes
- Overview of Steps:
- Day 1: Preparing the Croissant Dough (8 hours total)
- Preparing the dough (détrempe): 30 minutes
- First rise & preparing butter block (beurrage): 1 – 1 ½ hours
- Second rise: 4 hours (or overnight)
- Laminating the dough (one double turn): 1 ½ hours
- Laminating the dough (one single turn): 30 minutes
- Overnight rest
- Day 2: Shaping & Baking The Croissants (3 hours total)
- Cutting & shaping the croissants: 30 minutes
- Final rise: 2 hours
- Egg wash & baking: 25 minutes
- Day 1: Preparing the Croissant Dough (8 hours total)
- Using European-Style Butter: You can find European-style unsalted butter at most grocery stores. While it may be slightly more expensive, its higher fat content (typically 82% to 85%) makes it more pliable than regular butter, helping it spread evenly without cracking during lamination.
- Freezing Croissant Dough: You can freeze croissant dough at any stage before the final proofing (Step 32). Simply wrap the dough (or unrisen croissants) tightly in plastic wrap, place in an airtight freezer bag, and store in the freezer for up to three months. When you're ready to continue, thaw the dough or croissants in the fridge overnight before resuming where you left off.
- Storing/Freezing Baked Croissants: To keep croissants fresh, freeze any leftovers in an airtight freezer bag as soon as possible (preferably the same day). They’ll stay good for up to three months. When you’re ready to enjoy them, thaw on the counter or reheat in the oven for a few minutes.
Nutrition
Calories: 362kcal | Carbohydrates: 63g | Protein: 9g | Fat: 44g | Saturated Fat: 29g | Polyunsaturated Fat: 1g | Monounsaturated Fat: 2g | Trans Fat: 0.2g | Cholesterol: 132mg | Sodium: 884mg | Potassium: 113mg | Fiber: 2g | Sugar: 9g | Vitamin A: 262IU | Vitamin C: 0.01mg | Calcium: 37mg | Iron: 3mg