In testing this recipe, I set out to make a guide that covers all of the basics for making the perfect chicken pot pie in whatever amount of time you have. You can make everything from scratch or skip several steps by using store bought crust or pre-cooked chicken. Either way, this recipe should help you make a perfectly comforting and delicious chicken pot pie every time!
USING RAW vs. PRE-COOKED CHICKEN FOR CHICKEN POT PIE
To save time, you can use leftover chicken or turkey in this recipe or even pick up a grocery store rotisserie chicken. Just be sure to check your seasonings along the way, given that the chicken or turkey was likely already pre-seasoned.
SHOULD CHICKEN POT PIE HAVE A BOTTOM CRUST?
Traditional chicken pot pie has both a top and bottom crust that is made from flaky pastry. However, many recipes out there omit the bottom crust to save on time. Personally, though, I tend to prefer the crust-to-filling ratio that comes with having both a top and bottom crust.
Regardless of whether you use a bottom crust or not, you can always top your pot pie with a sheet of store-bought puff pastry or even biscuits!
HOW TO KEEP THE BOTTOM CRUST OF CHICKEN POT PIE FROM GETTING SOGGY
I always recommend blind-baking the bottom crust to ensure the pastry cooks all the way through and turns a nice and golden brown. Just be sure to use a little egg wash to “glue” the top crust to the pre-baked bottom crust, and it will come out perfectly!
HOW TO PREVENT A SOUPY CHICKEN POT PIE
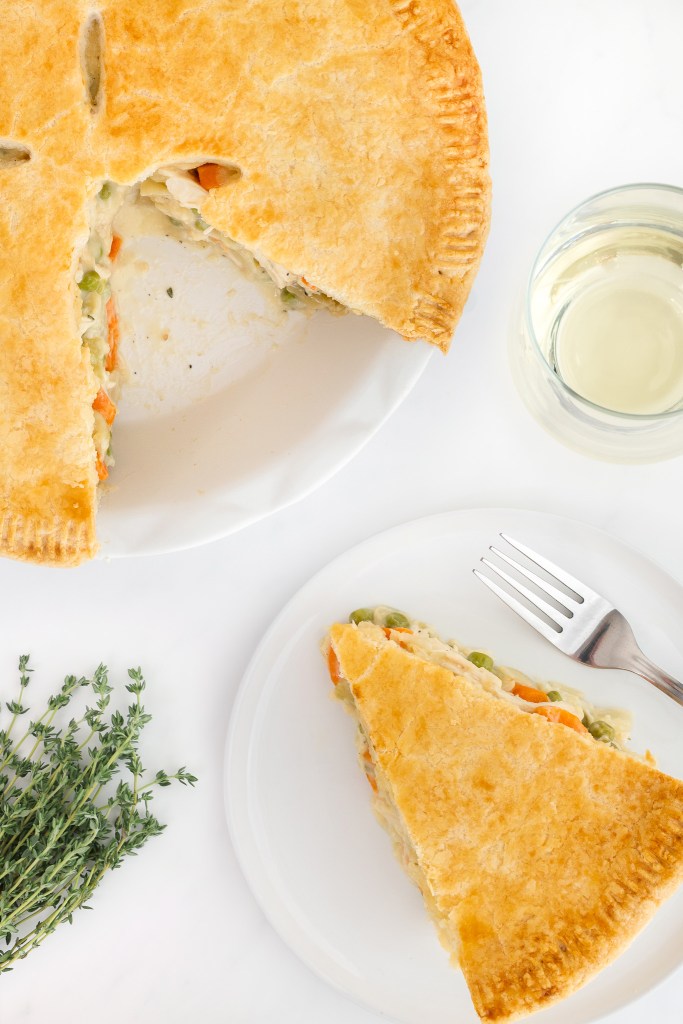
This recipe produces a perfectly creamy chicken pot pie that won’t turn to soup when you cut into it. Aside from the formulation of the recipe (i.e. amount of liquid, flour, add-ins, etc.), the only other tip to prevent a soupy chicken pot pie is to let it rest for at least 15 minutes before cutting into it. This gives the filling time to re-thicken after being heated in the oven.

PREPARING THE FLAKY PIE CRUST (skip if using a store-bought pie crust)
Dice the butter and shortening into ½” cubes and set them on a plate in the freezer for 5 minutes to chill.
In the meantime, whisk together the flour, salt, and sugar in the bowl of a stand mixer fitted with the paddle attachment.
With the mixer on low, add in the chilled, diced butter and shortening and continue to mix for about 5 to 8 minutes, until only a few very small pea-sized pieces of butter remain.
With the mixer still on low, drizzle the cold water in — a few Tablespoons at a time — and continue to mix until the dough just comes together. If there are any large dry patches of flour, you can add an additional 2 to 3 teaspoons of water.
Form the dough into two disks. The dough should be slightly shaggy, so you may need to knead it 1 to 2 times first.
Wrap the disks tightly in plastic wrap and return them to the fridge to chill for at least 40 minutes.
PRE-BAKING (or BLIND-BAKING) THE BOTTOM CRUST (skip if only using a top crust)
Preheat your oven to 400℉.
Remove one disk of the pot pie dough from the fridge and allow it to sit at room temperature for about 5 minutes. This will help prevent the dough from cracking when rolling it out.
On a floured surface, roll out the dough into a circle that is just slightly larger than your deep-dish pie plate.
Wrap the dough around your rolling pin and carefully transfer it to the pie dish. Gently press it into the bottom and sides of the dish.
Using a pair of scissors, trim off any excess dough around the edges of your pie plate. (You can use any extra dough to patch any problem areas!) Then, using the tines of a fork, crimp the edges of the dough and score the bottom of the dough.


Place the pie dish into the freezer for 15 minutes to chill. After 15 minutes, remove the pie dish from the freezer and cover the entire dough with aluminum foil. Fill the pie plate with pie weights, dried beans, or rice.

Bake the pie crust in the centre of your preheated oven for 20 minutes.
After 20 minutes, remove the pie weights and aluminum foil and continue to bake the crust for an additional 10 minutes, until it is lightly golden brown. It will likely shrink slightly — that’s OK!
Pro tip: Keep a close eye on the crust in the oven. If it begins to puff up, you can briefly remove it from the oven and re-score it with your fork (or press down on any puffed areas using the back of the fork). It is important to make sure your crust is nicely golden brown at this stage, so take your time and inspect it closely. If you don’t have a convection oven, you may also need to turn your oven to a low broil for the last 1 to 2 minutes.
Once perfectly golden brown, remove the crust from the oven and allow it to cool while making the filling for the chicken pot pie.

POACHING THE CHICKEN (skip if using pre-cooked chicken)
In a large pan (with a lid) or dutch oven over medium heat, add in the chicken stock and raw chicken breasts.
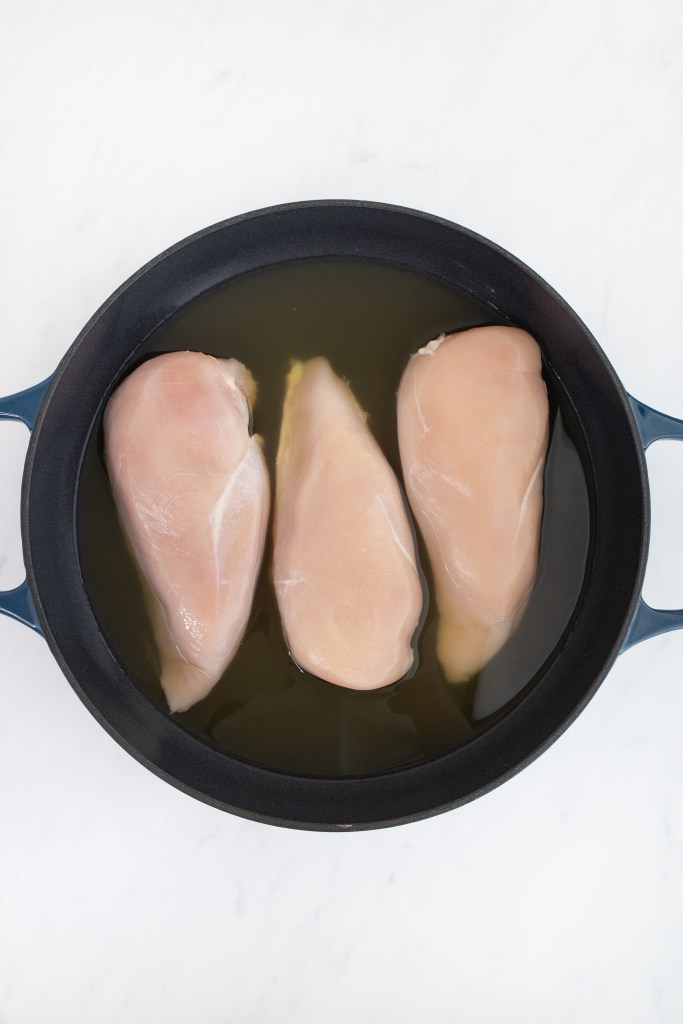
Continue to heat until the stock begins to bubble.
Cover the pan and turn the heat down to medium low. You want the chicken stock to bubble slightly but not come to a rolling boil.
Cook, covered, for about 20 to 25 minutes (depending on the size of your chicken breasts), until the internal temperature is at least 165℉.

Remove the chicken from the pan and allow it to rest on a plate for at least 5 minutes before shredding.
Pour the cooked chicken stock (used to poach the chicken) through a strainer and into a bowl or measuring cup, and reserve it for making the filling.
PREPARING THE CHICKEN POT PIE FILLING
In a large pan or dutch oven (you can simply wipe out the one used above) over medium heat, add in the butter and oil until the butter begins to foam.
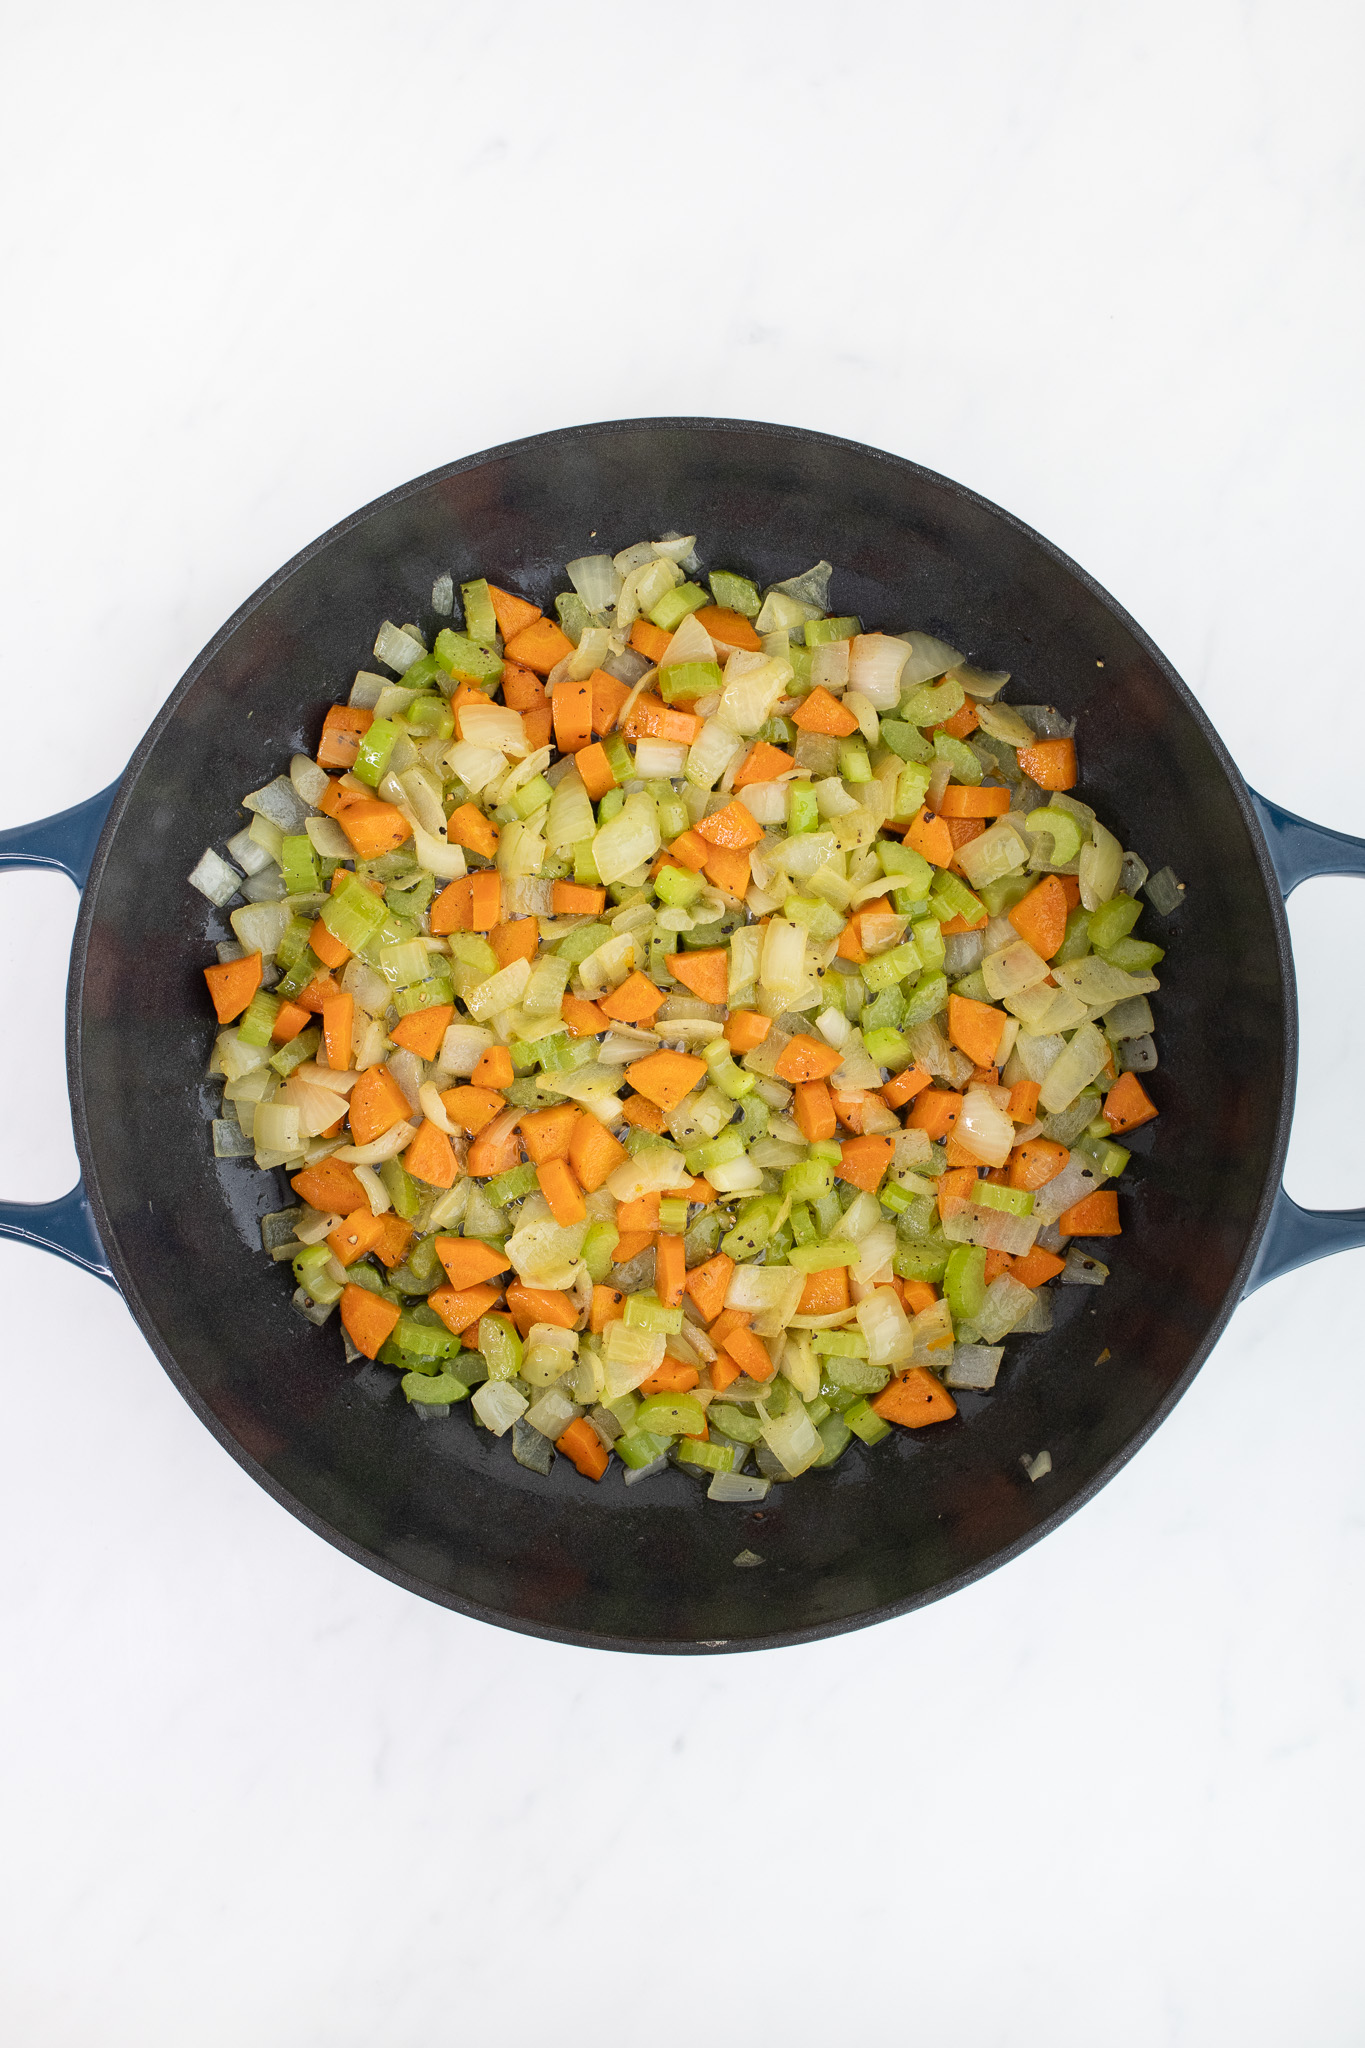
Add in the onions, carrots, and celery and stir to combine. Cover and cook for 5 minutes.
After 5 minutes, remove the cover and add in ½ teaspoon of kosher salt and ½ teaspoon of black pepper. Continue to sauté the vegetables, uncovered, until they are softened. I always test a piece of carrot to make sure they are tender (but not mushy) before proceeding.

Once the veggies are tender, add in the minced garlic and cook for 1 to 2 minutes, until fragrant. Then, add in the fresh thyme and cayenne pepper.
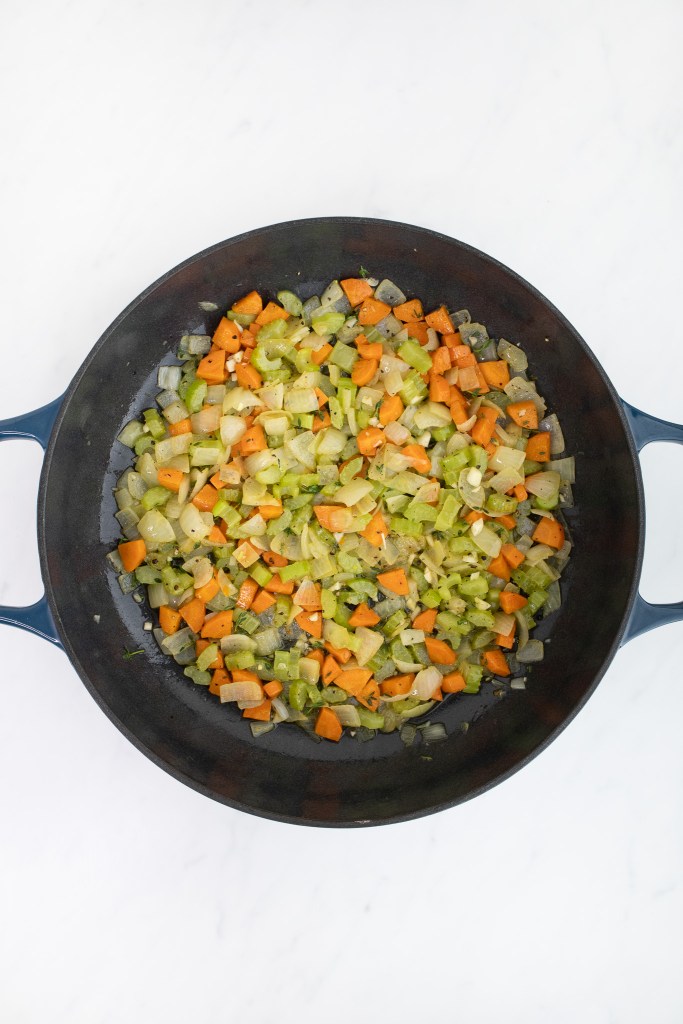
Stir in the flour until it coats the veggies, and continue to cook for another 1 to 2 minutes.
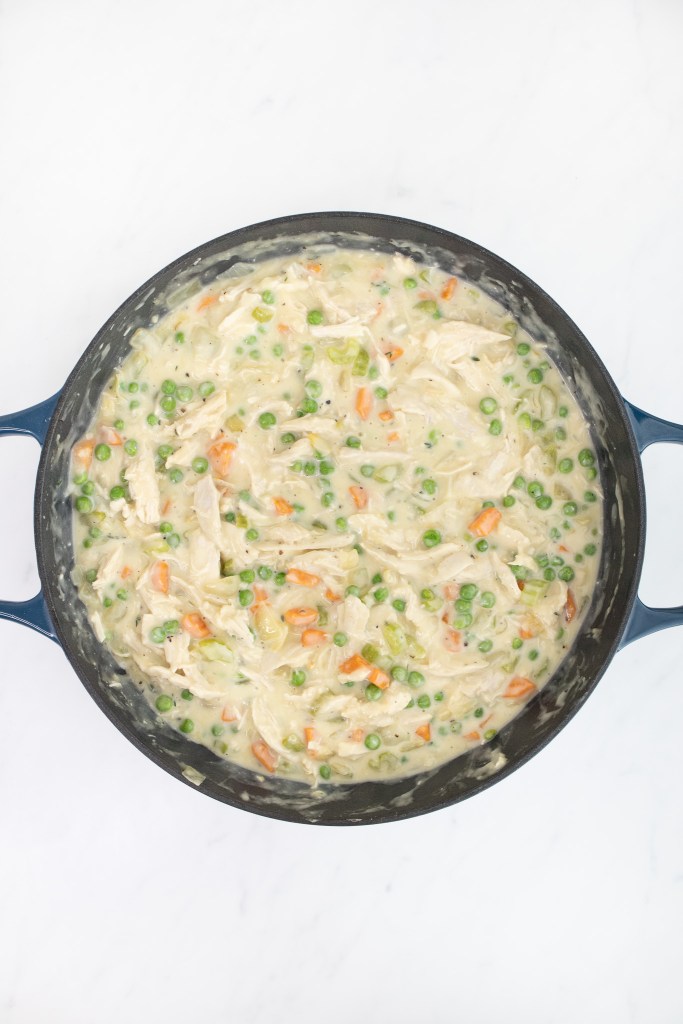
Pour in the ⅓ cup of white wine (or ⅓ cup of chicken stock), followed by the 2 cups of reserved cooked chicken stock. Cook the mixture, while stirring it constantly, until it is smooth and begins to bubble.
Then, turn the heat down to low and add in an additional 1 teaspoon of salt.

Stir in the shredded chicken, frozen peas, and heavy cream. Taste for seasonings. Depending on the chicken stock and brand of salt you use, you may need to add an additional ½ tsp of salt or more.
Turn the heat off, then cover the pan and set the chicken pot pie filling aside while preparing your crust.
ASSEMBLING AND BAKING THE CHICKEN POT PIE
Preheat your oven to 375℉.
In a small bowl, prepare your egg wash by whisking together 1 egg and 1 Tablespoon of water until homogenous. Set aside.
Remove the second disk of pot pie dough from the fridge and roll it out on a floured surface until it is between ⅛” and ¼” thick and slightly larger than your deep-dish pie dish. (If using store-bought crust or puff pastry, simply roll it out following the package instructions.)
Working quickly, so as not to let your crust get too warm, fill your cooled bottom crust (or pie dish if not using a bottom crust) with the chicken pot pie filling.

Brush the edges of the bottom crust, as well as the rim of your pie dish, with the prepared egg wash.
Using a rolling pin, transfer the top crust over the top of your pie dish and trim off any excess. Using the tines of a fork, crimp the edges of the dough (where you applied the egg wash) to the bottom crust or pie dish.
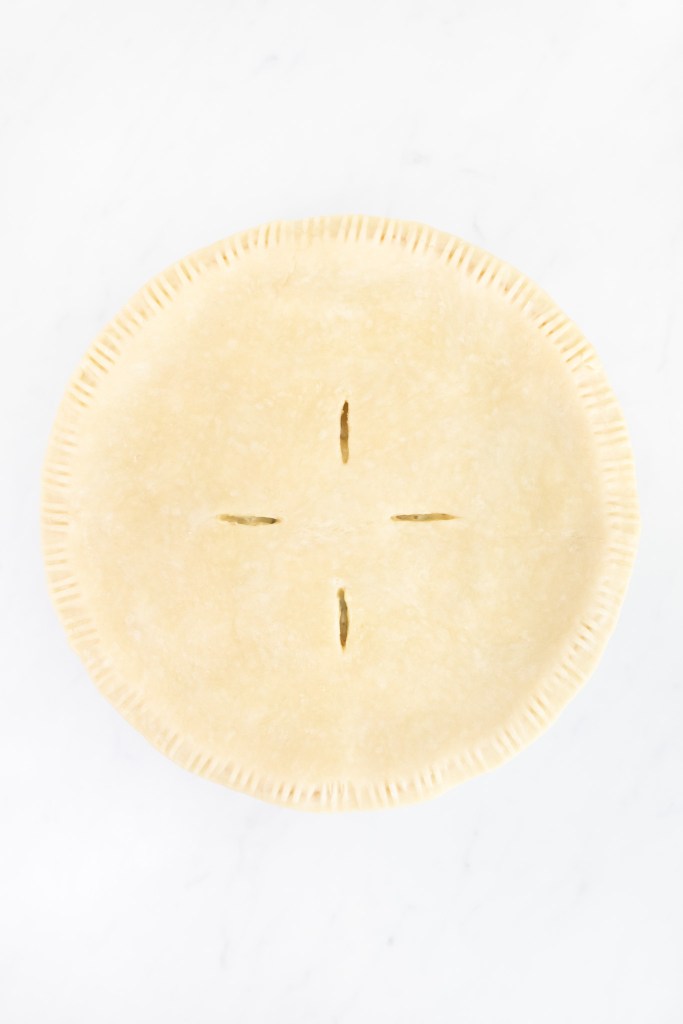
Brush the entire surface of the crust with the egg wash and cut several slits in the top to allow steam to escape when baking.
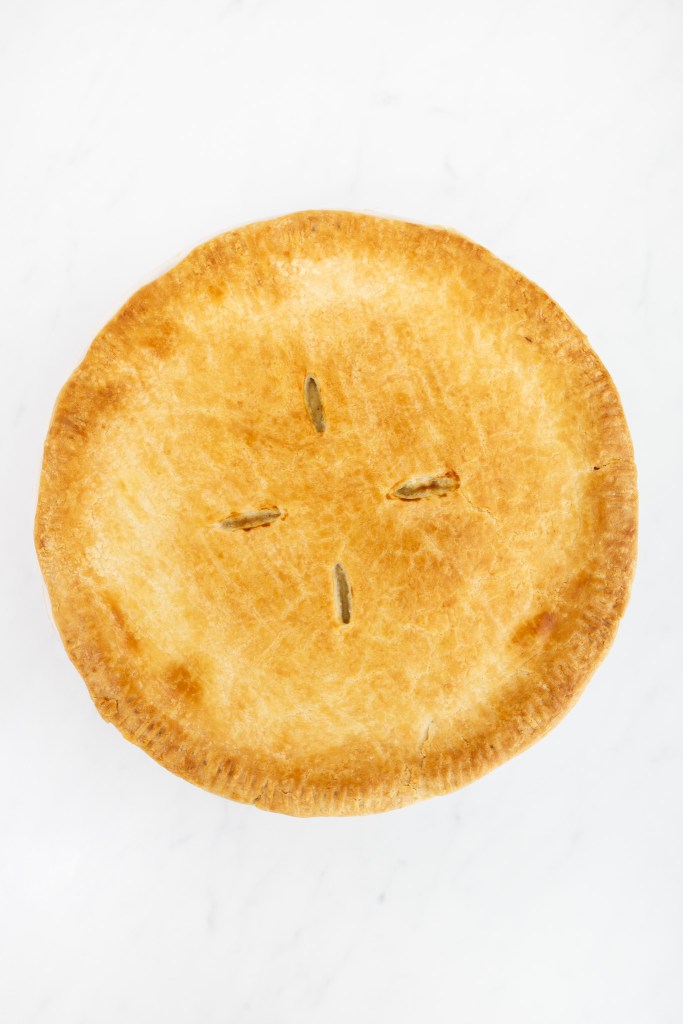
Place the pie on a baking sheet and into the centre of the oven to bake for about 40 to 45 minutes, or until nice and golden brown.
To prevent your chicken pot pie from being too liquidy, I recommend allowing the it to rest for at least 15 minutes when it comes out of the oven before cutting and serving.
Ultimate Chicken Pot Pie (Complete Guide)

Ingredients
For the Flaky Pie Crust (or use store-bought pie crust; see Note 1, below)
- 3 cups all-purpose flour (spooned and leveled)
- 1 ½ tsp kosher salt (I use Diamond Crystal)
- 1 tsp granulated sugar
- ¾ cup (1 ½ sticks) unsalted butter, chilled and cut into ½" cubes
- ⅓ cup vegetable shortening, chilled and cut into ½" cubes
- ½ cup cold water
For the Chicken Pot Pie Filling
- 1 ¼ lbs (567g) raw chicken (breasts), or 1 lb (454g) cooked chicken (see Note 2, below)
- 2 cups low-sodium chicken stock
- ¼ cup (½ stick) unsalted butter
- 2 Tbsp extra virgin olive oil
- 1 ½ cups onions, peeled and ¼" diced (about 2 medium onions)
- 1 cup carrots, peeled and ¼" diced (about 1-2 medium carrots)
- 1 cup celery, ¼" diced (about 2 medium stalks)
- 3 cloves of garlic, peeled and minced
- 1 ½ – 2 tsp kosher salt, divided (quantities as listed in Instructions)
- ½ tsp ground black pepper
- 2 tsp fresh thyme
- ¼ tsp ground cayenne pepper
- ⅓ cup all-purpose flour
- ⅓ cup dry white wine (or additional chicken stock)
- 1 cup frozen peas
- ½ cup heavy cream
- 1 large egg (for egg wash)
Equipment
- 9" Deep-Dish Pie Plate (like this one)
Instructions
Preparing the Flaky Pie Crust (skip if using a store-bought pie crust)
- In the bowl of a stand mixer fitted with the paddle attachment, whisk together flour, salt, and sugar.3 cups all-purpose flour1 ½ tsp kosher salt1 tsp granulated sugar
- With the mixer on low speed, add in chilled, cubed butter and shortening. Mix until only a few small, pea-sized lumps of butter remain (about 5 to 8 minutes).¾ cup (1 ½ sticks) unsalted butter, chilled and cut into ½" cubes⅓ cup vegetable shortening, chilled and cut into ½" cubes
- With the mixer still on low, slowly drizzle in cold water. Continue to mix until the dough just comes together. (If there are any large, dry patches of flour, add in an additional 2 to 3 tsp of water.)½ cup cold water
- Pour out the dough out a lightly floured surface and knead 1 to 2 times. Form the dough into two disks, wrap them tightly in plastic wrap, and chill them in the refrigerator for at least 40 minutes.
Pre-Baking (or Blind-Baking) the Bottom Crust (skip if only using a top crust; see Note 3, below)
- Preheat oven to 400℉. Alternatively, if using a store-bought pie crust, simply follow the package instructions to pre-bake the crust.
- Remove one disk of dough from the refrigerator and allow it to sit at room temperature for about 5 minutes. (This will help prevent the dough from cracking when rolling it out).
- On a lightly floured surface, use a rolling pin to roll out dough into a circle that is just slightly larger than your pie plate (keep the dough moving to prevent sticking). Wrap the dough around the rolling pin and carefully transfer it onto a 9" deep-dish pie plate. Gently press dough into the bottom and sides of the dish.
- Using a pair of scissors, trim any excess dough around the edges of the pie plate. (Any extra dough can be used to patch any problem areas!) Using the tines of a fork, crimp the edges of the dough to the pie plate, as desired, and score the bottom of the dough. Set the pie plate in the freezer for 15 minutes to chill.
- Remove the pie plate from the freezer and cover the bottom and sides of the dough with aluminum foil. Fill with pie weights, dried beans, or rice. Bake in the centre of preheated oven for 20 minutes.
- Remove the pie weights and aluminum foil, and continue to bake the pie crust until it turns golden brown (about 10 minutes more). (It may shrink slightly around the edges — that’s OK.)Pro tip: Keep a close eye on the crust in the oven. If it begins to puff up, quickly remove it from the oven and re-score it (or, with the back of a fork, press down on any puffed areas). It is important to ensure your crust is perfectly golden brown before proceeding to fill it, so take your time and inspect it closely. If you don’t have a convection oven, you may need to set the oven to a low broil for the last 1 to 2 minutes.
- Once nicely golden brown, remove the crust from the oven and allow it to cool while preparing the chicken pot pie filling.
Poaching the Chicken (skip if using cooked chicken)
- In a large pan (with a lid) or dutch oven set over medium heat, pour in chicken stock and add in raw chicken breasts. Heat stock until it begins to boil.1 ¼ lbs (567g) raw chicken (breasts), or 1 lb (454g) cooked chicken2 cups low-sodium chicken stock
- Cover the pan and reduce heat to medium-low. Cook, covered, on a low simmer until the internal temperature of the chicken reaches at least 165℉ (about 20 to 25 minutes, depending on size of chicken breasts).
- Set cooked chicken breasts on a plate. Allow to cool, at room temperature, for at least 5 minutes before shredding. Set shredded chicken aside.
- Using a wire mesh strainer, strain cooking liquid (cooked chicken stock) into a bowl or measuring cup. Reserve for the chicken pot pie filling.
Preparing the Chicken Pot Pie Filling
- In a clean large pan or dutch oven (same as above) set over medium heat, heat butter and oil just until the butter begins to foam.¼ cup (½ stick) unsalted butter2 Tbsp extra virgin olive oil
- Add in diced onions, carrots, and celery, and stir to combine. Cover and sauté vegetables for 5 minutes.1 ½ cups onions, peeled and ¼" diced1 cup carrots, peeled and ¼" diced1 cup celery, ¼" diced
- Season with black pepper and ½ tsp of kosher salt. Continue to sauté the vegetables, uncovered, until softened. (I use a fork to test whether a piece of carrot is tender, but not mushy, before proceeding.)½ tsp ground black pepper
- Stir in minced garlic and cook until fragrant (about 1 to 2 minutes). Then, stir in fresh thyme and cayenne pepper.3 cloves of garlic, peeled and minced2 tsp fresh thyme¼ tsp ground cayenne pepper
- Add in flour and stir to coat the vegetables. Continue to cook for an additional 1 to 2 minutes.⅓ cup all-purpose flour
- Pour in white wine (or additional ⅓ cup of chicken stock), followed by the reserved cooked chicken stock (2 cups). Cook, stirring constantly, until the mixture is smooth and begins to bubble.⅓ cup dry white wine (or additional chicken stock)
- Reduce heat to low and add in an additional 1 tsp of kosher salt. Stir in the shredded chicken, followed by the frozen peas and heavy cream. Taste for seasoning. Note: Depending on the type of chicken stock and the brand of salt you use, you may need to add an additional ½ tsp of kosher salt (or more).1 cup frozen peas½ cup heavy cream
- Remove chicken pot pie filling from heat. Cover and set aside while preparing the crusts for assembly.
Assembling and Baking the Chicken Pot Pie
- Preheat oven to 375℉.
- In a small bowl, prepare egg wash by whisking together 1 large egg and 1 Tbsp of water until homogenous. Set aside.
- For the top crust, remove the second disk of dough from the refrigerator. On a lightly floured surface, use a rolling pin to roll out dough into a circle that is just slightly larger than your pie plate and between ⅛" and ¼" thick. Alternatively, if using store-bought pie crust or puff pastry, follow the package instructions.
- Working quickly — so as not to let the raw dough get too warm — fill the cooled, pre-baked pie crust (whether homemade or store-bought) or pie plate (if not using a bottom crust) with the prepared chicken pot pie filling.
- Brush the edges of the bottom crust (and/or the rim of the pie plate) with egg wash. Wrap the dough around the rolling pin and carefully transfer it on top. Trim any excess dough, then crimp the edges to the bottom crust or pie plate (over the egg wash). Brush the entire surface of the top dough with the egg wash and cut several slits in the top to allow steam to escape while baking.
- Set the pie on a baking sheet, then into the centre of the oven. Bake until the top turns a nice golden brown (about 40 to 45 minutes). Depending on your oven, you may wish to set the oven to a low broil for the last few minutes to achieve the desired look.
- To prevent the final chicken pot pie from being too liquidy, I recommend allowing it to rest for at least 15 minutes before cutting and serving.
Notes
- Homemade vs. Store-Bought Pie Crust: To save time, you can certainly use a store-bought pie crust as the bottom crust. Just be sure to pre-bake (blind-bake) the pie crust according to the package instructions before filling it with the chicken pot pie filling.
- Raw Chicken vs. Cooked Chicken: This recipe guides you through the steps to poach the raw chicken (in chicken stock, for added flavor) in case you wish to make the entire chicken pot pie from scratch. Of course, if you are short on time, you can always use leftover cooked chicken or turkey (or even a grocery store rotisserie chicken). Just remember that you will need between 1 to 1 ¼ lbs of cooked chicken, which is about 3 to 3 ½ cups shredded. (Remember that raw chicken weighs 25% more than cooked chicken, although a little more or little less won’t affect the recipe all that much.)
- Top & Bottom Crust vs. Top Only: Another shortcut you can take is omitting the bottom crust entirely, which allows you to skip the steps needed to pre-bake the bottom crust. Simply make the filling, pour it in a pie dish or casserole, and cover with a homemade or store-bought crust (or even store-bought puff pastry). I prefer my chicken pot pie to have a bottom crust — I think it has the perfect crust-to-filling ratio — but if you are looking to save time (or if you just simply prefer it), you can easily forgo the bottom crust altogether.
- Pre-baking (Blind-baking) the Bottom Crust: If using a bottom crust, I strongly recommend pre-baking it. Some recipes don’t call for blind-baking the bottom layer, but I find it often comes out raw and soggy on the bottom (even when the filling isn’t overly soupy). Furthermore, I recommend pre-baking the bottom crust slightly longer than you normally would for a pie, just to ensure you won’t end up with a soggy bottom!
- Freezing Instructions: Chicken pot pie freezes perfectly well for up to 2 to 3 months! When ready to serve, simply bake, covered with aluminum foil, at 375°F until warmed through.